Lunar Reconnaissance Orbiter
NASAs LRO is one of the longest running and most productive non-
If you just want to be amazed by the sights to be seen on our nearest celestial neighbour you could just have a browse here, where there are many beautiful images to be examined.
Anyone wanting just a quick look at an area of the moon is probably best just heading for the Quickmap viewer here. You get an interface like the one shown below, and it’s pretty straightforward to zoom in an out, pan around and so on to get to the area you want to look at. This site also allows you to produce quick and dirty 3D models, and I’ll deal with that later.

The menu on the left shows you various layers of data that are available as well as the standard view. If all you want is a quick photo, just do a screengrab and crop it in your favourite photo-
But what if you want a little more detail -
Again, we have a number of options available to us. LRO products exist in relatively straight forward image formats like ‘.TIF’, or ‘.PNG’ format, to much larger ‘.IMG’ files with different levels of treatment. This page outlines the various data types, from unprocessed raw images to the same images that have been referenced to their physical location on the moon.
The simplest way to find a specific image is to use the image search facility:

There is a bewildering array of search parameters to choose from there, but the simplest one is to enter a coordinate range that covers the area you want to look at. To narrow down the results it’s worth choosing the product type (see the data type page I referenced above) and then an observation type. The main choices are between those beginning with N for Narrow Area Camera and those beginning with W for Wide Area Camera.
The results of your search will appear in the bottom of the page.

Click on a link to go look at an image and you’ll see something like this:

The main part of the page is obviously the image, and you can zoom in and out and pan around. The left hand side is mostly information about the image, such as when it was taken and the coordinate range it covers.
In the top left is a collection of links to download the image. The first two are in .IMG format, the third is a .TIF image. We’ll go over how to process the images later. If you save any, make a note of the image size, which is given as image lines and line samples.
Another area of these search pages allows you to download a collection of files that can go towards building 3D models in a GIS package, as well as pinpoint photographic images. The search procedure is broadly similar.

Again the simplest method is to enter a coordinate range and choose from the options at the bottom. The best results (that I have found) are the Regional Products and NAC_DTM options. As before you’ll get a list of results at the bottom of the page, and these links show pages that relate to the Apollo missions:
Each of those pages contains a list of downloadable images (Apollo 16 and 17 have multiple pages), some of which are photographic in nature, others relate to the physical properties of that surface, such as its elevation. My recommendation is to sacrifice some hard drive space and just get them all.


Another source to look through is the Lunar Orbital Data Explorer. The Data Product Search and Dataset Browser options are useful if you know exactly what you are looking for, but the easiest option is the Map Search facility.
On this tab, you’ll need to zoom in on your area of interest and select which dataset your are interested in.

In the example above I’ve zoomed in on Hadley Rille and chosen a Narrow Area Camera layer. I’ve then clicked on ‘Select Products by Area’ button and dragged an area on the map. The software will interrogate its database and come up with a yellow ‘Click to view’ box when it has results. Click it, and you’ll get this.

You’ll see a list of files to browse through. If you know which files you need, or want lots of them, you can click on the box on the right of the list and ‘Update Cart’. The ‘Download’ tab will take you through a checkout procedure. You’ll need to enter an email address that they will use to send you a link to the files you’ve requested.
Or you could just click on one of the links to get a page like this.

The above is a composite -
TIF images are easy enough to open, but lets assume you’ve landed yourself with a bunch of IMG files that you don’t know how to handle -
Helpfully the nice LRO people produced a handy document describing exactly how do open IMG files in Photoshop, and you can find that here.
The trick is to use the ‘File’, ‘Open As’ option, then choose ‘Photoshop Raw’ as your Open As choice.


You’ll come up against a dialogue box where you’ll need to enter the image details that were on the page from which you got the image. Image lines corresponds to height and Line samples corresponds to width. You may get a message about the image size, which you can ignore.
Once it’s open you can then mess around with the image as you would any other.
That takes care of dealing with the images in 2D, what about in 3D?
Well, we can again resort to the software discussed on other pages, QGIS. If you have downloaded raw files with no georeferencing work done you’ll find this very difficult as it is hard work to get the coordinate systems used in large DEM surface models with the much smaller IMG photography -
You could, if you were really keen, load global image packages (anything from 2-
Or you could just trust that the nice LRO people have done a good job and use their files.
So, first fire up QGIS, then add the two most important files, namely the IMG ones that show the ground surface and elevation. Here I’m using Apollo 14’s data. The LRO strips are quite large, so you may find it useful to employ the clipping techniques I describe on this page to reduce the size of the image you’re having to process. I’ve already done this, hence 4 layers rather than just 2.

Next is the process of elimination to find the appropriate coordinate system in QGIS so that it will display data in 3D. See the Chandrayaan page for more on this. Having found one, you can then generate a nice 3D image of your landscape. Here are two views of Apollo 14’s landing site -


Particularly cool here is here is the footpath heading from the LM to the edge of cone crater in the image on the right.
One thing worth noting is that on many of the DEM’s from the LRO the elevation data are negative, which means that the 3D plugin will give you a projection that is very small (effectively below your monitor!). To fix this, go to the ‘World’ option in the plugin window and change the Vertical shift value from ‘0’ to something that will being it nearer ‘eye level’. I this case the lowest elevation value was -

One of the other layers you may have downloaded is the coloured slope map that gives an indication of elevation in colour. Here’s what that looks like for the map section above, and in 3D.


The output isn’t as dertailed, but as a quick method it’s very useful.
A final resource for lunar DEM data is the Astrogeology Science Center site, and there are several LRO maps to found there.
Have fun exploring LRO space data!
Later versions of QGIS and this plugin don’t give you quite as much control, but the principle is the same. Sadly the exported models don’t work (at the time of writing) in Chrome or IE, but they do work in Microsoft Edge and Firefox. See my JAXA page for more details on the new version.
Now, all that’s very well, but if all you want is a quick and dirty method of making a 3D model then you can use one of the tools built in to the LRO Quickmap site.
To do this, what you first need to do is zoom into the area in which you are interested and then click on the square icon. This allows you to draw a square on your chosen subject area.
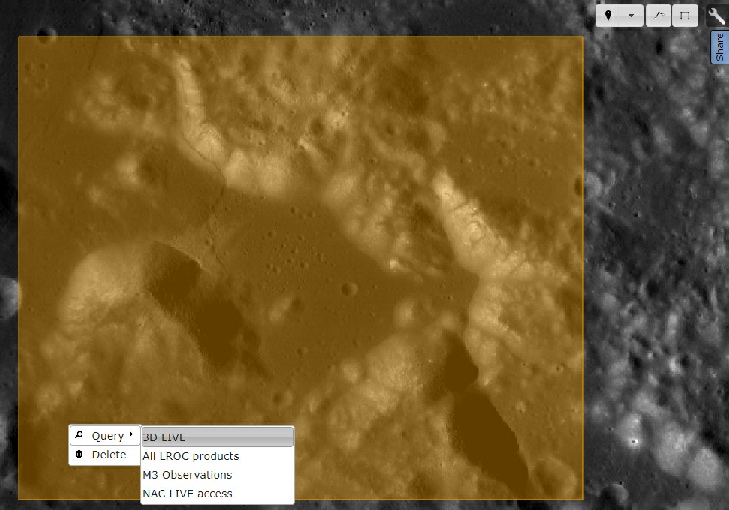
Once you’ve done that, click the box you#ve drawn and choose ‘3D Live’.
The page will do a little processing and you’ll get a window popping up like this.

Clicking on the ‘Export 3D model’ button will open a new page like this.

Which will allow you to pan, zoom and rotate to your heart’s content.
As the Quickmap also allows the use of layers from other probes, you can get quick 3D images using some non-

