The new LO3 view is much better than the old one, and there are relatively few areas that can definitely be stated as not being there on the LO3 compared with LRO. That said, the ones that are there are better defined in the LRO, and neither show the detail of the 16mm frame, so you have to ask how they arrived at that level of detail! Better still is the OHRC image, which shows the presence of far more small craters and rocks that are visible in the 16mm view.
Can we keep this going? Let’s try -

There is one view that they could have had, and that is looking towards the LM landing area from Surveyor. To illustrate this, the image below shows a composite view contained in the report linked to at the top of the page with a portion of AS12-

There are two ways of looking at the implications of the above comparison. One is to go “A-
The other view is to look at the Apollo 12 photograph in its entirety, as it includes the Surveyor probe, and the parts of the surface that are not photographed by it in such detail. The probe, LM, and every rock and micro-
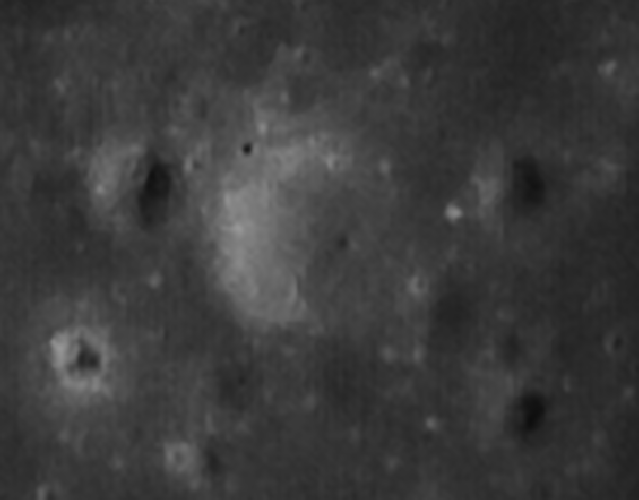
It’s also worth pointing out that the Surveyor images contain the rocks and craterlets that are visible in LRO and OHRC footage but not LO3, as is shown below with views from the two probes (LRO left, LO3 centre, OHRC right). Surveyor was there, and is the only possible source for Apollo’s alleged ‘stage set’, as the photograph that could have given the exact position for rocks and craters isn’t up to the job.

So yes, they had a good idea what would be waiting for them. No, this did mean they built a set on Earth.
Likewise these 3 imprints made to test the stability of the surface can be found in a section of AS12-
And also these imprints found in AS12-
I could devote a whole page just to the trenches, but it would take up too much of my life, and would have been a much easier task if the Apollo crew hadn’t trampled all over the scene, and if they’d been more methodical in their recording of the details!
Focusing solely on Surveyor crater would mean we miss out on some of the other lovely craters the crew visited while they were there. The first EVA took a stroll out to a large shallow depression called Middle Crescent Crater. While they were there they took a panoramic sweep of photographs, and this can be found here. There are high quality views of the crater available at Gone To Plaid’s site, and these have been used in preference to lower quality images despite them not covering the whole crater.
The top image shown below is the Apollo pan. The image below left is the LO view, and the one below right the LRO.

On the same EVA that explored Surveyor crater the crew passed Bench crater. It was photographed from its north side in a series of images looking south. The ALSJ panorama constructed from these images contained an error, so I did my own, adding an extra photograph from a second pan. I then compared it with the best of GoneToPlaid’s images (below left) and the Lunar Orbiter view (below right).
So, first things first -
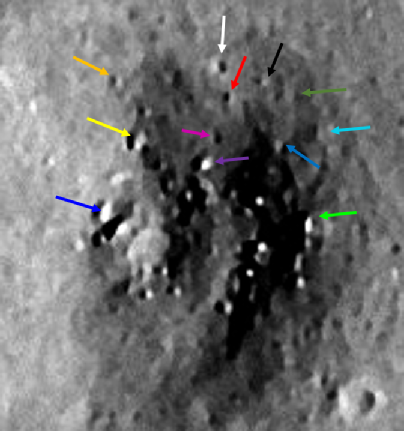
The X shows my estimate of where Conrad is standing. This is based on two things. Firstly, the views towards the LM with Bean heading towards him and the mounds marked by the magenta and red arrows. Secondly, underneath the ‘X’ is a small area of darker ground -
Can we sure about the other features?
Well, the larger mound is clearly visible in all three photographs, and the smaller mound to the right of it marked by the red arrow is also seen in the LRO image. There is a suggestion that it is there in the LO3 view, but it is not clearly defined. Turning towards the LM and Bean, the blue arrow shows the darker small crater within the one that the astronauts have passed around on both sides. This smaller crater is not discernible on the LO3 photograph.
The remaining arrows identify features that also can’t be seen on the LO3 view, although the viewing angle and sun bleaching of the photographs do make it difficult to be absolutely certain, and they are pinpointed as much through logical deduction as specific crater features.
Again, LO3 does well in this image, but because of the way it is lit many smaller features are not visible at all, and it isn’t possible to pick out with any certainty which rocks are which.
Before heading for a final view from the LM I have one more look at Surveyor crater, this time zooming in in even more detail on the debris littered double crater on the southern wall. Later in the mission it is less in shadow and we an see more details, so let’s have a look at them.

Apollo 12
Apollo 12’s most interesting feature as far as the photographic record is concerned is the presence of another piece of hardware just across from its landing point, the Surveyor 3 probe.
In some ways this presents us with a problem, in that we very obviously did have detailed photographs of a landing site well in advance of an Apollo mission, more of which later. The Surveyor 3 mission itself was launched in April 1967, two and half years before Apollo 12 arrived but after Lunar Orbiter 3 surveyed the area in February of the same year.
Details of Surveyor 3 can be found here and here, and remarkable footage (made from the individual photographs beamed back to Earth) can be found here. A comprehensive review of the TV system on Surveyor 3 (along with many photographs sent back to Earth) can be found here. Its mission was to sample soil, test soil mechanics and send information back to Earth, and the results (along with those of other Surveyor probes) can be found here, and a discussion of Apollo 12’s observations of the probe and the material they returned from it can be found here.
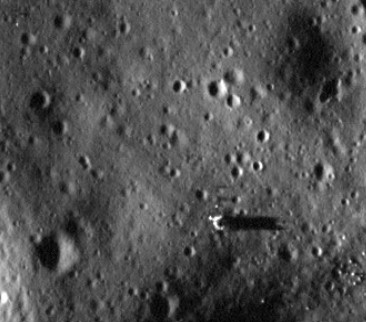
The best photograph of Apollo 12’s landing site from above prior to the mission can be found in Lunar Orbiter 3 (LO3)’s high resolution frame 3154 H2, which can be found here. Since this page was written a new version has come on line from the LOIRP, which can be found here and I have therefore updated most of the images.
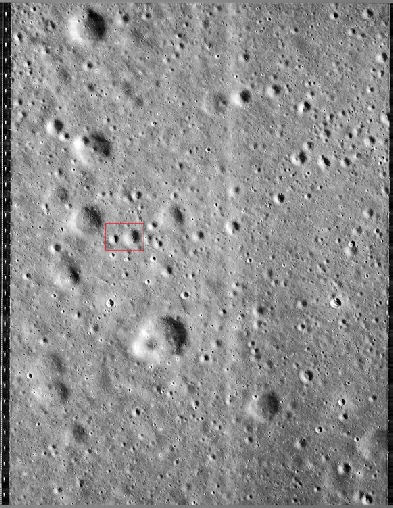
The landing area for Apollo 12 is identified by the red rectangle, which takes in both Surveyor crater and the wider area of operations for the crew. A comparison of the LO3 image (right) with the LRO view of the same scene (left) is given below. The LRO view used is another GoneToPlaid version, chosen partly because the shadows make features more easily visible, and can be found here. The version used below for LO3 is the updated version.

The first observation to make here is that there is that the LO3 image of the landing area seems to be much better than the equivalent view for Apollo 11. Much more detail is evident (particularly in the new version), largely thanks to the angle of the sun giving better contrast between light and dark areas. As will be seen, however. Closer inspection shows that the fine detail visible in the LRO view is still absent when we get down to ground level.
A second point to make is to note a small error in the LO3 version. In the centre line of the LRO photograph, directly above the lunar module (LM), there is a triplet of craters. In the LO3 version this triplet is truncated, either as a result of a transmission error or from incorrectly assembling the printouts that were the basis of the photograph. There are other instances where the LO3 view puts craters in different places compared with the LRO, again probably from a compounding of transmission and printing errors.
While the is an excellent degree of correspondence between the two photographs, the extra clarity of the LRO version allows features to be identified that are not present in the LO3 image, particularly small boulders such as those in Surveyor crater.
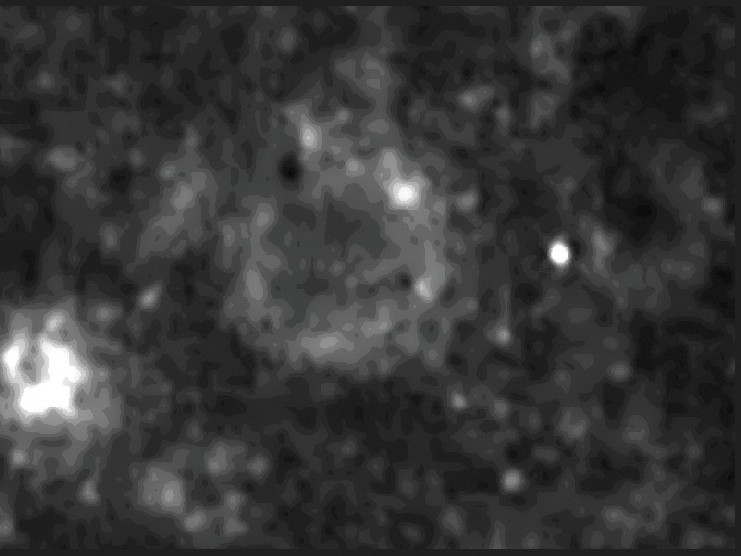
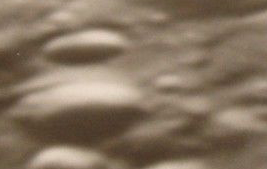
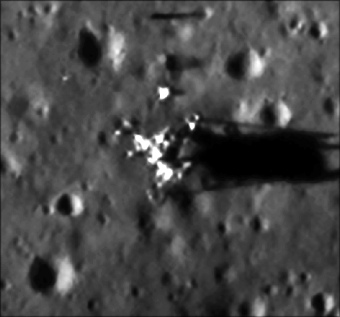
The first comparison with Apollo imagery is from the 16mm landing sequence, available here. The central view is that of the 16mm camera. The left view is from the L03, and the right that taken by LRO. Below all of these is the OHRC version.
I’ve rotated the view of the two vertical photographs to help match it with the 16mm view. This first shot is still some way out from landing, with the eventual landing spot just to the left of the area shown. In my original version of this image I picked out features that can be spotted in the LRO and Apollo views, but not the LO3. In the new version, the blue arrow points to a feature that became visible -

And what we expected to happen is confirmed, although the new version of the LO3 image is much better. It starts to get obvious that the LO3 image lacks the detail shown in the LRO, which itself shows a lot of small craters that are evident in the 16mm footage, but not in LO3. This is particularly true of shallower craters that show less definition.
The OHRC vie wis by the sharpest and shows all of the detail visible in the Apollo footage.
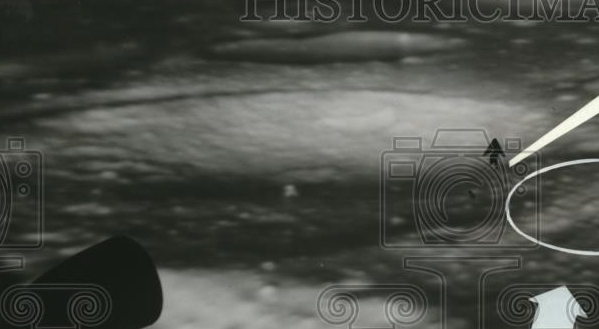
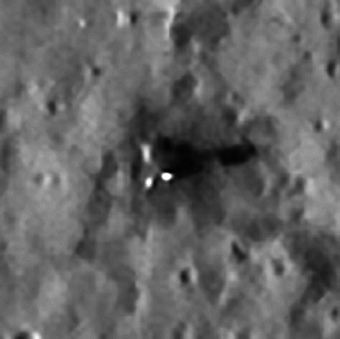
Now let’s see how it looks just as the LM begins to kick up some dust.


The difference in perspective makes it slightly confusing, but the path does become clearly visible in the Apollo photograph in the middle distance. If you follow the paths up from the LM on the LRO image you come to an elongated diamond shape followed by a single path that skirts a small crater to the left of it, then diverge around a larger crater, with the left path taking a winding route. It is this winding route that emerges on the Apollo view. With the smaller crater visible nearer the LM and the larger crater next to the path just beyond it. The re-
So, what have we learned?
We’ve learned that the restored Lunar Orbiter images contain an impressive amount of detail, and that substantial amounts of that detail can be seen in Apollo images. Substantial amounts of detail can not be seen, however, and there is also the consideration that the modern ultra-
Even with that improved quality, the LRO view of the Apollo landing site reveals details that are not seen in lunar orbiter views of the landing site. We also have a view provided by an existing probe that, if the Apollo 12 landing had been created in a studio, could have provided important details. In practical terms it would have been impossible to recreate this in the level of detail shown in Apollo images. It is simpler by far to confirm that the reason Surveyor 3 images match Apollo 12 images is because the two were at the same place at the same time: on the Moon.
For more on matching Surveyor photos with details in Apollo images, see here.
The view from China
In April 2018 China released much higher resolution versions of its images from Chang’e-


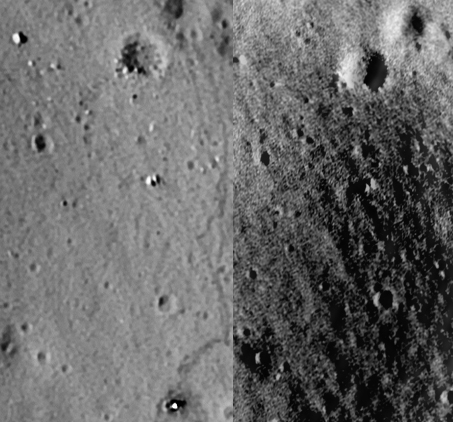
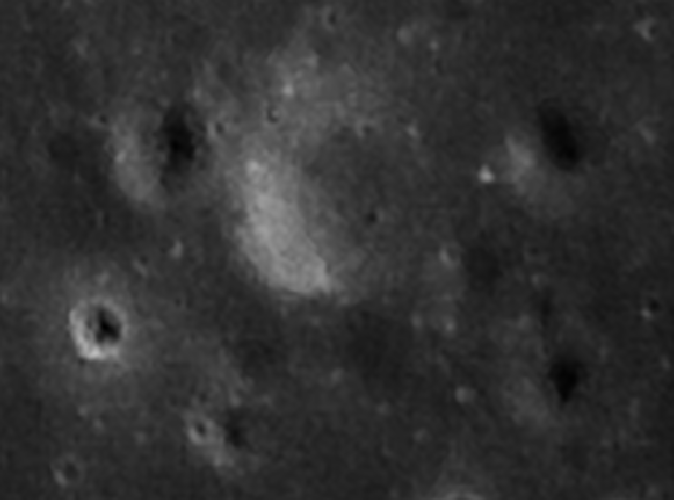
On the larger features LO3 does well -
We’ve already seen this double crater in LO3 views in other analyses above, and we can see in close-


What should be standing out here is that the craters further away are a good match for the LO3 photograph, but when you get closer the to the camera the LRO shows more detail, particularly the shallow craters and surface undulations that are much less obvious in L03.
Next up we move a little closer to the eventual landing site. Closer means nearer to the ground, so the features we see are starting to get smaller, which means we should start to lose definition in the LO3 photograph more quickly than the LRO. In the view below the LRO is on the left this time. OHRC is below right.
Looks like it to me.
The OHRC image again provides excellent detail and confirms the 16mm perfectly.
By contrast, although the LO3 image does manage to just about pick out the mini-

Hopefully it should be obvious that this is the same scene, and you can even make out the small rocks on the rim of the crater in the centre. By way of comparison, the two images below show pre-

The post-
So, do we have sufficient detail in an LRO image capable of resolving details in that 16mm frame? Let’s see, this time using a new image.


Here’s another panorama, this time taken from much nearer the LM. I did this one because a moron on a conspiracy site was insisting that craters visible from orbit should be visible from the ground but they weren’t. He’d already moved the goalposts several times, so I did a fresh one just for him.
The panorama in question is this one, and I’ve used just the part of it that looks over to Surveyor crater.

One final consideration is the evidence provided by the tracks made by the crew as they went about their duties. The image below shows part of AS12-

Another interesting aspect of the landing footage can be found in two photographs offered for sale on eBay showing the view from the LM simulator looking down at the area. The simulators were, as outlined in the preamble to these pages, drawn from images taken by Lunar Orbiter, and here are the two views representing 4000 and 1800 feet above the surface.


And just so you can work out what we’re looking at, here’s the same area from lunar orbiter (or look at the OHRC view at the top of this page).
Now, your average conspiracy idiot is fond of saying it was all done with simulators, because with their incredible google-
Let’s see how it looks when you compare the 4000 and 1800 foot views of Surveyor crater.

Well, it’s certainly more in focus, but there is no more detail visible in the craters, and it certainly isn’t as sharp as the LO images on which it was based.
By coincidence, another image (evidently from the same sequence as it has the same date) also came up for sale on eBay and shows the view at 250 feet, this time focusing solely on Surveyor crater.

There is obviously much more detail in this image as the surface gets nearer -
Let’s get on with the mission.
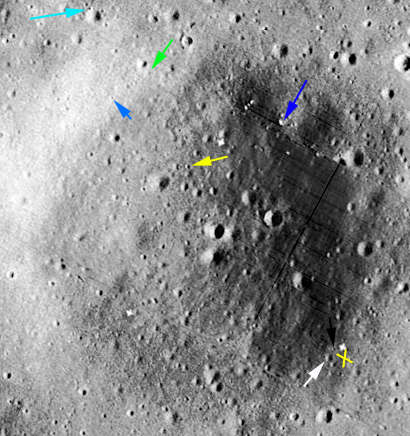
After landing one of the first EVA jobs is to set up the ALSEP scientific equipment, which was transported from the LM to its location about 130m by Alan Bean. While he did this Pete Conrad did some exploring, and captured a series of photographs near the ALSEP site that include Bean carrying the ALSEP towards him.
Although Bean’s movement during the capture of this sequence makes life difficult for the panorama stitching software, there is good coverage of 360 degrees around Conrad, and one feature in particular is easy to spot. This feature, known somewhat imaginatively as ‘the mound’ was interesting enough for Conrad to investigate further and take more photos.
The panoramas available are tricky because they are geographically inaccurate -


The red circle here identifies the location of the LM, while the green one picks out the location of the Surveyor-
Just so we can be certain we are looking at the right areas, here they are zoomed in.

If you refer back to the LO images at the top of this page, you’ll see that those dark areas just aren’t there. Hoaxtards need to explain what caused those disturbed areas. It’s quite a common throwaway argument that ‘remote control ‘ could have put the equipment there, but the disturbance caused by human feet is something else entirely.
Chandrayaan 2
As with Apollo 11, India’s Chandrayaan 2 has also imaged this landing site, and also as with Apollo 11 the data released to date is in the form of a web presentation. It’s worth pointing out that this presentation is 3 months earlier than the one some moon hoax morons like to use with lower quality images as proof of some shit or other.
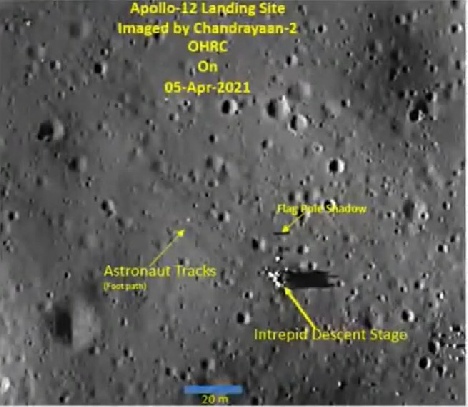
After an almost interminable wait India finally released the high resolution OHRC file covering Apollo 12’s site, and it does not disappoint:

Trails, hardware, small rocks and craters, everything exactly where it should be. Let’s try and do some comparisons with images we looked at earlier -
This one from the final moments of landing is a good one:


And this one of Conrad getting the contingency sample:


Both images now have much more corroborative detail than the LRO provided, and even more than the original LO. Note in particular the small rock in the crater behind Conrad.
Then there’s Bench crater:
There’s no need for arrows here -
We could spend all day doing this. One thing’s for certain -
Some time later, several years in fact, Chandrayaan-


Like the LO photo, the lighting is different. Unlike the LO photo there are clear details in it that match exactly the Apollo 12 image.
Then there’s Middle Crescent crater, only this time let’s just look at a small piece of it.


 Lunokhod 2

As with Apollo 11, India’s Chandrayaan-
In this view on the left I’ve shown the whole ‘snowman’. We can also see the Surveyor 3 probe in great detail.


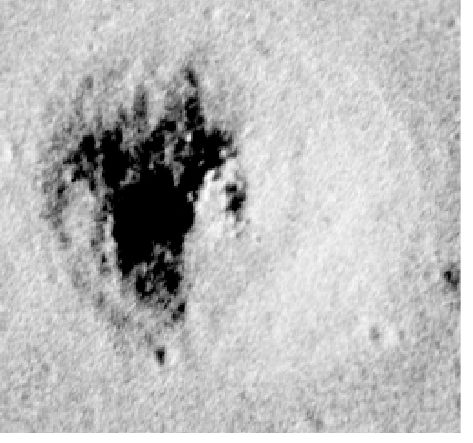
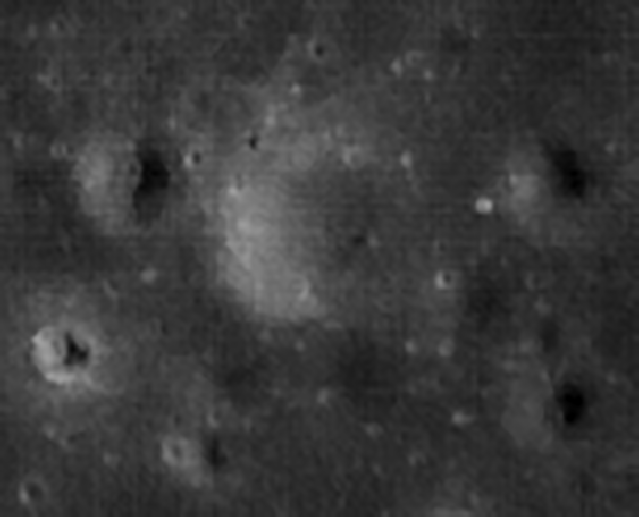
The best example of details not seen in the LO3 photographs but visible in Apollo and LRO shots is the views of Surveyor crater. And the best view of the crater as a whole comes from a panorama made of AS12-

The most obvious thing missing from the LO3 is the detail inside the crater, and I’ve pointed out some obvious ones that are only there on the Apollo and LRO views. The boulders around the large double craters on the far wall are completely absent, as are the majority of the craterlets on the main crater floor.
The improved LO3 image picks out some features that the older one doesn’t, but most features are still either missing or very faint.
Could these rocks have been identified by the Surveyor cameras?
The short answer is -

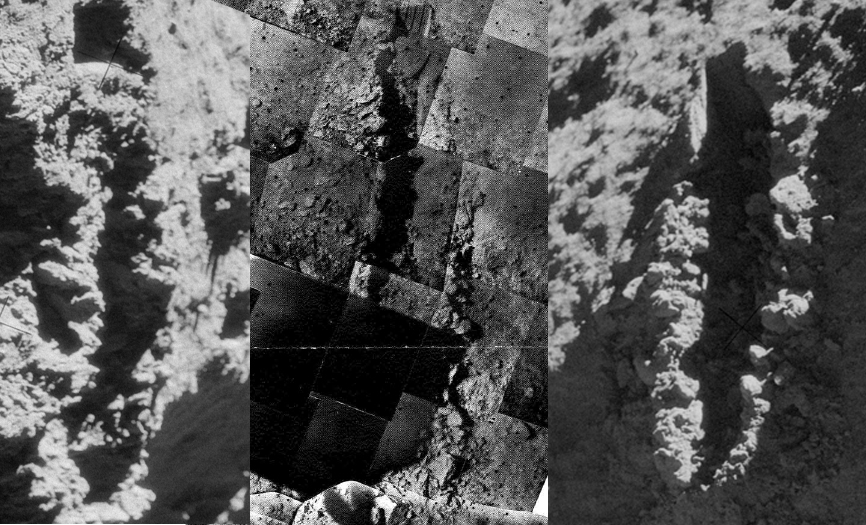
As well as perfecting the macro-
The view left shows, in the centre, one of Surveyor’s composite views of one of the trenches it dug, compared with what I believe is the same trench photographed by Apollo (based on debris features alongside the trench walls). The Apollo photographs concerned are AS12-

In this instance, the LO pre-
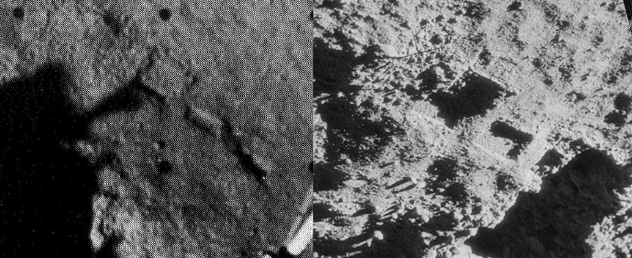
The purple arrow, for example, is pointing to a boulder that isn’t visible, and the crimson coloured arrow is pointing at a small craterlet that isn’t visible in the LO view, and the twin lighter blue arrows show a line of rocks that can’t be made out in the LO picture.
The yellow X marks the spot where the photographs were taken, but while the craters around this spot can be seen in both overhead views the line of rocks seen in the Apollo photograph are not there in the Orbiter shot, whereas some of them at least can be seen in the LRO’s image.
So how come the Orbiter does so well in this shot compared with others? The main reason is that all the features identified are the other side of a relatively large crater. They are, by definition, larger objects otherwise they would not be visible in the Apollo photograph. Smaller objects nearer the astronaut’s camera are not visible in the Orbiter photograph but are seen in the LRO photograph.
It’s a shame that the foreground is so much in shadow and that the detailed LRO view is not available for all of it, as I believe this would have proved the point conclusively.
Again, as with Apollo 11 the detail in what is a screengrab is more than a match for the LRO photograph. The OHRC full resolution image will be the nail in the coffin for hoax morons everywhere.
[Some time later….]

Naturally the dribbling loons dismiss this as South Korea photoshopping evidence for NASA, for, well, reasons or something.
The reality is that you can download the raw images yourself and do your own processing -
Addendum
But wait, there’s more!
On a well known moon hoax loving facebook group, Rasa Vihari, China’s favourite toilet cleaner, and one of his top contributors, think they’ve found a smoking gun relating to the unmanned probe views of the landing site (specifically India’s) and photos taken of Alan Bean emerging form the LM.
Here are the posts, the one on the left being the one they decided was worth their derision and incredulity.


Let’s try and pick it apart.
Firstly, it looks like they’ve go all confused by the shadows in the ISRO image -
The photo in question is AS12-
Bean and Conrad exited using the ladder on this leg of the LM (yellow arrow), which means that Conrad will have been standing somewhere around the red circle, looking roughly south-
Can we check that?
Again, yes, there are some photos of Conrad leaving the LM taken by Bean.


We can even check Conrad’s visor, and by inverting it so that the view is the same as he would be looking at, we can also identify craters in the ISRO image.

Here’s one of them, AS12-
So, we know that there are features in the exit shots that show which leg they used to exit, and that confirms the direction in which Conrad was facing.
Where’s this steep walled crater of which the hoaxers are so sceptical? Let’s make this quick and easy.


Yep, that’s right. It’s very simple: if you get the position of the photographer correct, and are prepared to actually look, you can very quickly work out that yes, in fact, it isn’t that difficult to identify the steep walled crater. I doubt it’ll convince the loons in Rasa’s group though.
Scroll back up for more detailed looks at the various features in the crater that are confirmed by unmanned probes.

The Lunar Orbiter photos were available to the public, as shown these editions of Aviation Weekly and Spaceflight technology, published on November 10 and 24th.

It’s worth noting that the post landing photo gets the actual landing site wrong!
A couple more were captured in August:


The claims are obvious nonsense, and the only supporting evidence you will get from him is “trust me bro”. He’ll claim he’s spoken to people in CNSA and NASA. That’s bullshit. Contradictions to his opinion get deleted.

And again in October.

We digress.
Even allowing for this being a screenshot from a video, the detail is impressive, and perfectly matches what can be seen in the LRO images, right down to the astronaut trails.
For the avoidance of doubt, this is the presentation he claims made NASA force them to add an enhanced Lunar Module.


And this is the first presentation featuring clearly labelled high resolution OHRC images -
It’s also worth pointing out, because some people claim NASA interference with the data because ISRO have NASA’s DSN at their disposal, that the file came through India’s DSN at Bangalore (as indicated in the image filename: ‘d18’ is Bangalore).
Apollo 12’s image was collected on orbit 7191 at 16:06 on 05/04/21. It was downloaded 10 hours later, so roughly 02:00 on 06/04/21 -
South Korea
While South Korea released some images from Apollo 11 and 17, they didn’t make much of a fuss over other image releases, but that’s not to say that they haven’t been busy uploading them to their server. This image, taken on 02/04/23, clearly shows the lunar module casting a shadow, and the paths around Surveyor crater and beyond.
The LM and Surveyor 3 probe can be made out, as can trails away from the LM.
With a bit more digging around we can find the CCD images used to derive thee larger scale ones. Trawling through China’s archive reveals this image taken by the forward facing camera:
CE2_BMYK_CCD-
Which translates to being taken on 24/11/10 between 09:24 and 11:22. Here’s the full image (rotated sideways for convenience).

And once you’ve flipped it and found the location of the snowman, increased the dpi and done a little level adjustment, this is what you get.
The LM and Surveyor 3 locations are easy to spot.