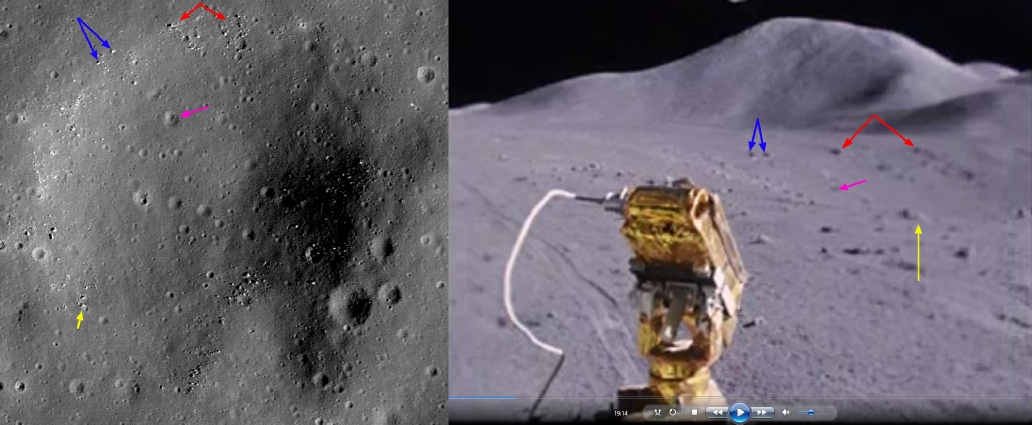
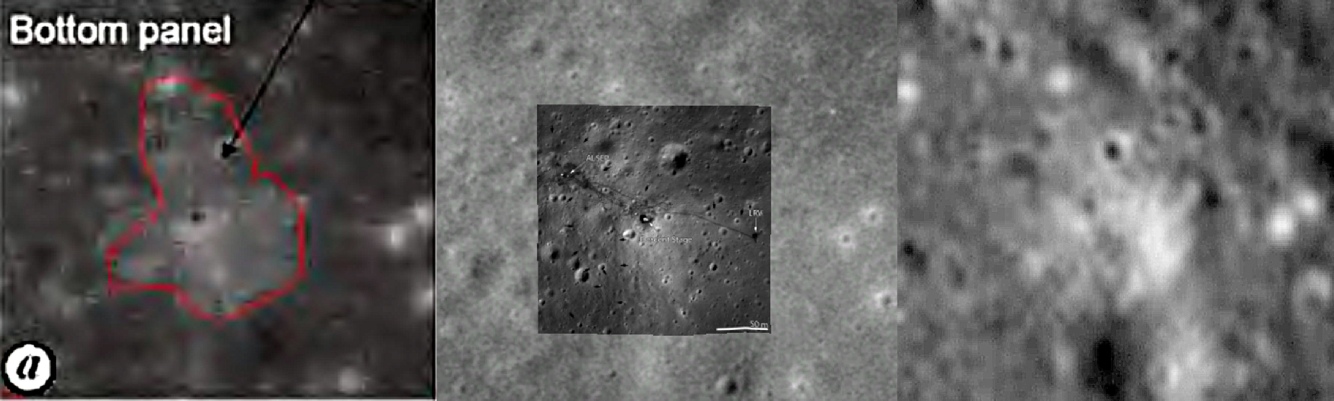
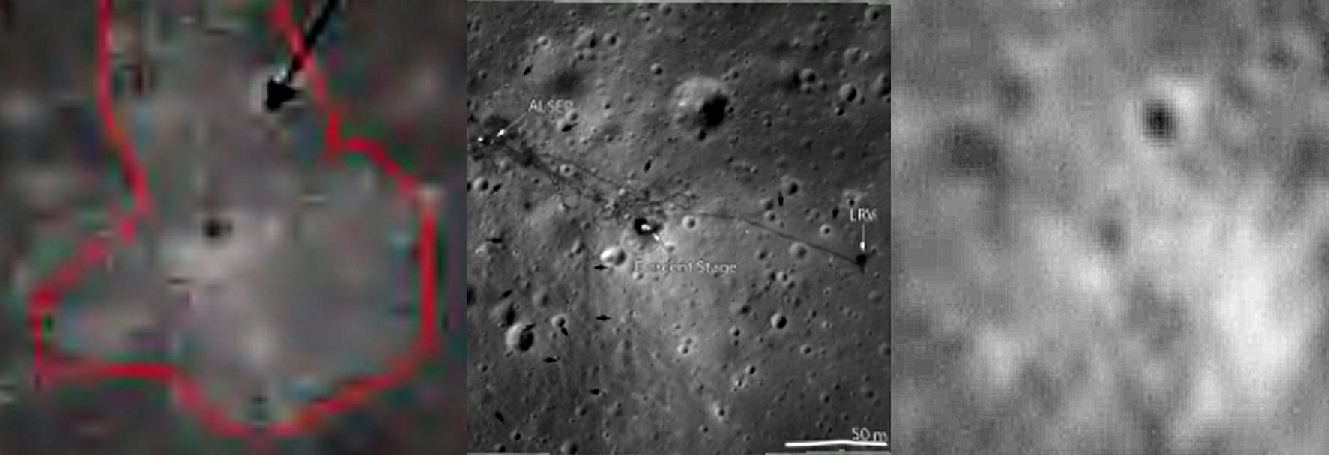
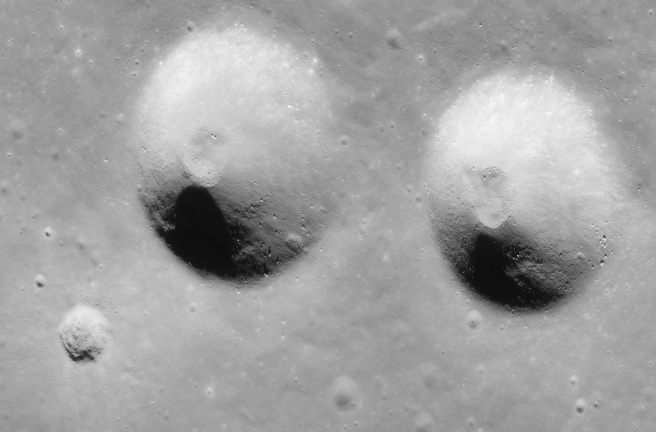
The hollow arrows are visible on all 3 pictures and are there to show that we are looking at the same view. To the right of the pair of craters at the top of the photographs (the left-
What was giving a superficially accurate overview of Hadley Rille in the simulator does not compare with the detail visible in an Apollo 16mm still even from 3000 feet and from a lossy video conversion.
Now on to the landing site photographs.
Some elements of the Hadley Rille site have been discussed elsewhere, but it’s worth having a quick look before beginning our own exploration of the site. The exploration in question comes from the JAXA/SELENE probe, run by the Japanese, and it took a photograph from above the Apollo 15 site. The ground model scanned at the same time allows them to reproduce a 3D view of the site (you can see more examples I’ve done of this here). The resolution is not adequate to pick out small details, but the topography is an exact match for a photograph taken by Apollo astronauts.

How could Apollo have possibly constructed such a 3 dimensionally accurate topographic recreation of the Hadley Rille site without actually going there? Let’s take a quick look at the alternatives:
1) They couldn’t
2) They had to go to the Moon
Those are the only options. The contour maps of the Hadley Rille area before the landing were not adequate enough to produce any kind of reproduction of the site for some sort of studio set. The contour maps that exist of the site after landing were all produced from data gathered by Apollo 15’s mapping camera. So in order to fake the Apollo 15 landing site the only data they had existed after they landed from data collected during the mission.
OK, enough sniping at the stupid -
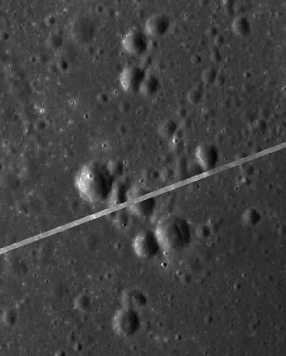
The best LO image of the Hadley Rille area is from LO5 and is a medium resolution view of the entire rille. The highest quality version found for the purposes of this analysis is here, and is image 105. Image 106 also shows part of the rille and all of the landing area. There is a high resolution image from LO4, but the ground resolution is not as good as the medium resolution shown below, If better resolution versions exist, I have not found them. The LOIRP has recently recovered better quality versions of image 105, but the high resolution part does not cover Apollo’s landing site and the current version given online is of no better quality than 106’s.
There are a variety of LRO photographs available, some from the ALSJ, others from the LRO website. Which one we use depends on what is under examination.
As with other missions, we’ll start at the beginning with some footage of the landing, using stills taken from this footage.
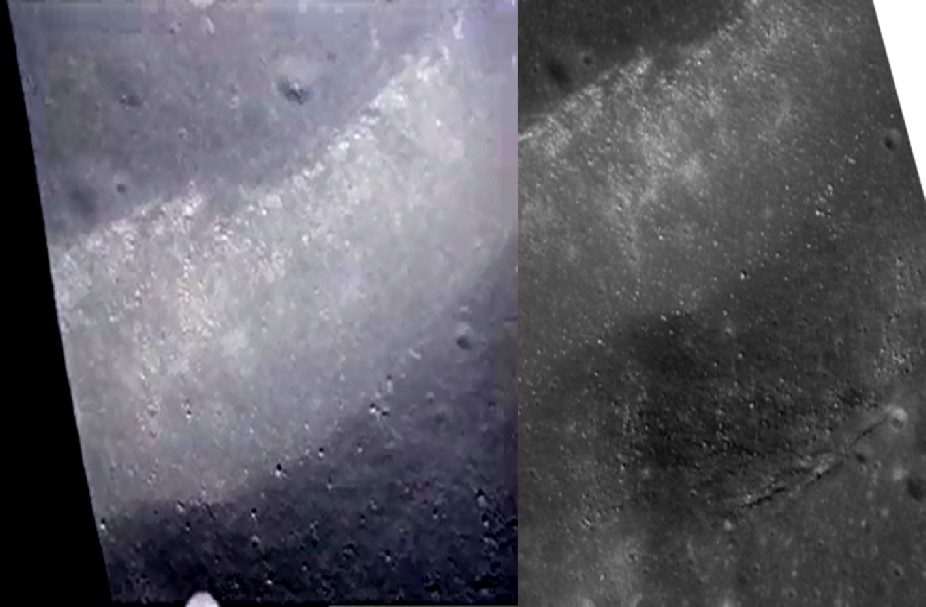
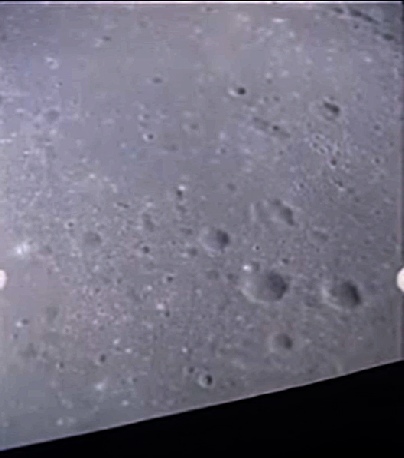
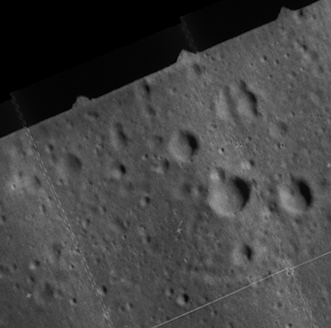
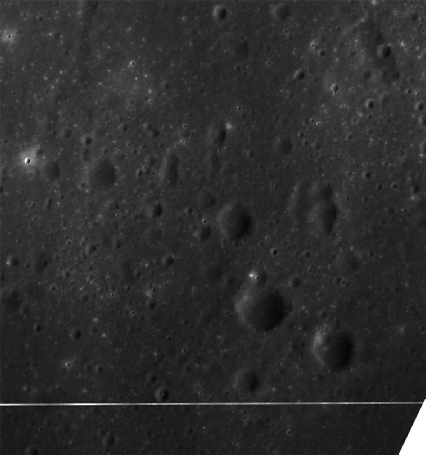
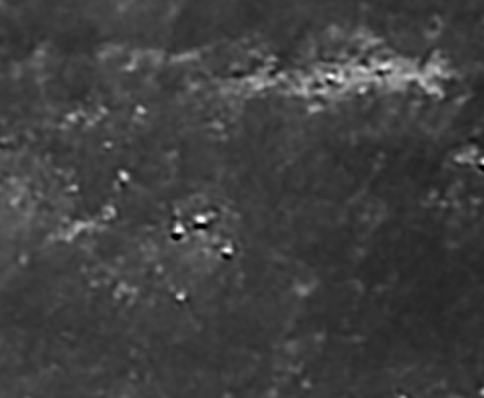
The first view is still a while before landing, and is looking across the landing site towards Hadley Rille. To the right of the 16mm still shown below is the LRO view of the same area, and the LO5 view of the same is to the left.
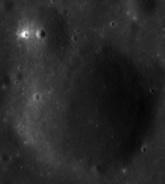
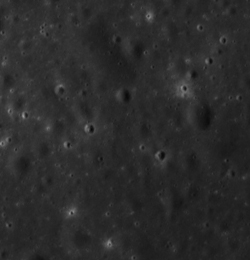
The LO5 view shows nothing more than a few blobs, and while I am reasonably sure I have picked out the right area, there is always the chance that I have got it wrong. In contrast, the craters in the LRO view are easily identifiable, from the large crater bottom left with it’s smaller craters at 6 and 9 o’clock on its rim, to the larger surface depression off to the right, and the twin craters close to the top of the 16mm still near the window frame (just below the ring marking the position of the LRRR in the LRO view. Look carefully and you will see many more smaller craters that can be picked out in Apollo and LRO viewpoints. Look carefully at the LO5 image and you will make out very little.
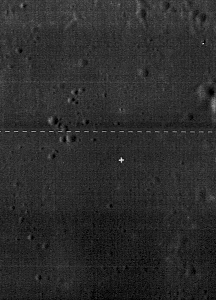
If we look at one more still taken just as dust begins to be picked up, there are still craters that can be identified in both Apollo and LRO. I haven’t even bothered to try picking them out on the LO5 picture, as all you will see are a few pixels.
The match is exact, despite there being no corresponding view available from previous orbiting craft.
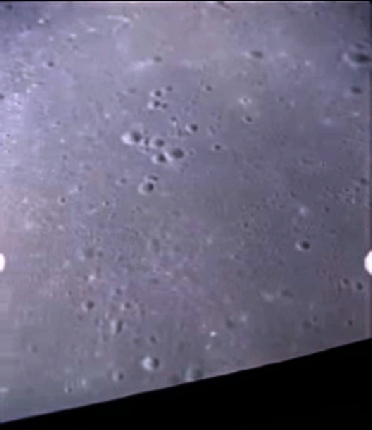
There is even a view of the same area in the video taken from the LM after separation from the CSM (left, the view including the CSM, right the view on a different orbit), but these are early in the mission and most of the rille is in darkness.
The other LRO view of Pluton crater comes from combining two images, as the boundary line between the left and right view of the the area cuts through it (left and right). Once this has been done (and the image enhanced to make it brighter), we can then compare the panorama with the vertical and oblique views of the North Complex.
It’s worth noting that even the view from orbit taken by the LM 16mm camera is of comparable quality to that of the LO5 photographs, and the still image is considerably better.
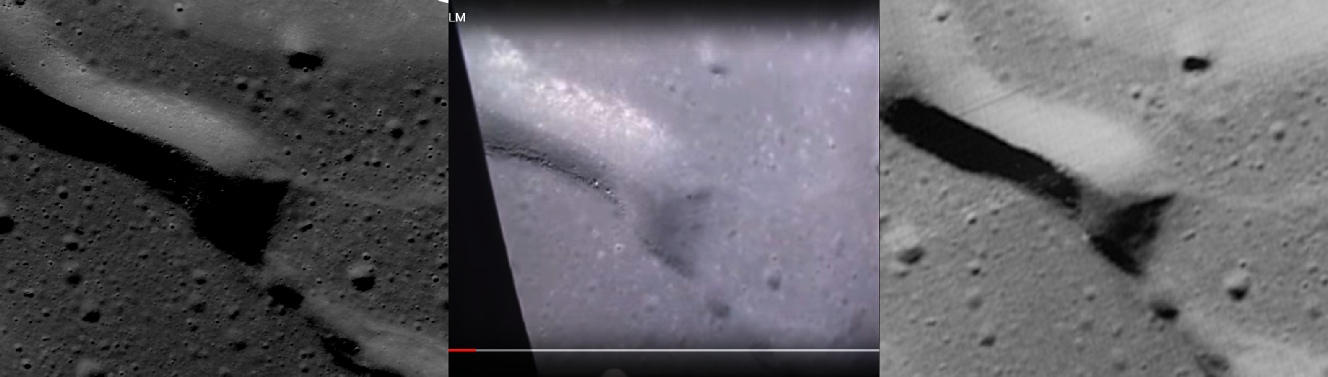
The Danuri image (below) despite being lower resolution that the LRO, confirms the details shown by Apollo.
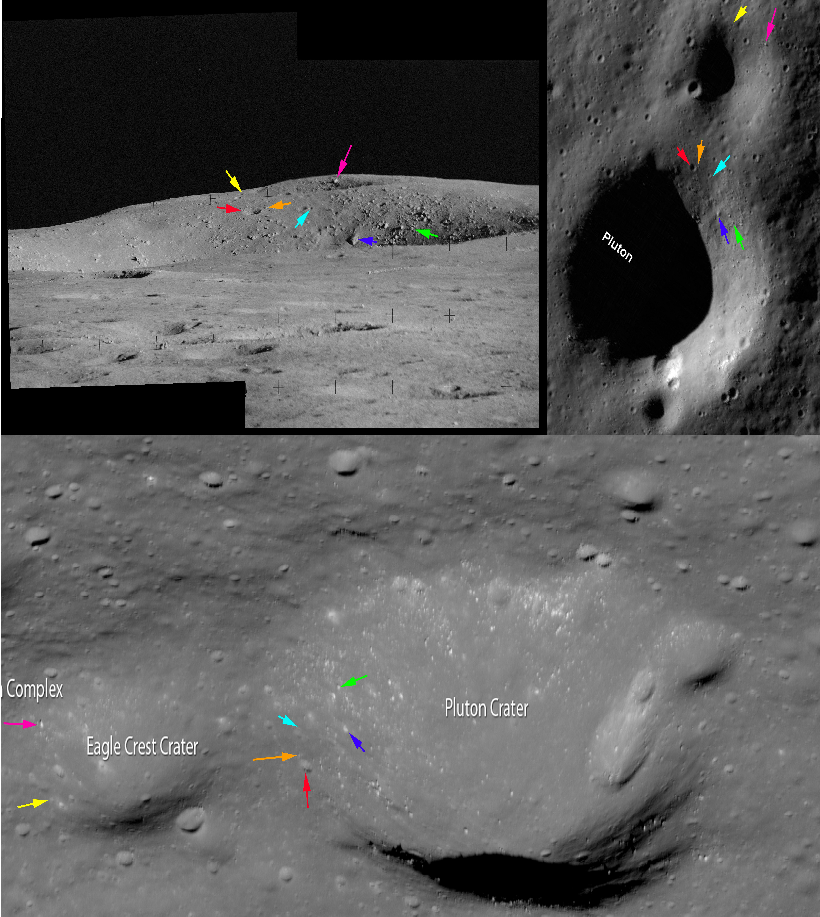
Most of the small details in the Apollo photograph are well picked out in the Oblique view, and the shadow from the vertical hides much of it, but all three show details not in the least bit visible n the LO5 view.
The oblique view also shows the same large rock at the back of Eagle Nest crater (pink arrow), as well as the rocks on the crater wall of Pluton. The small crater on Pluton’s far wall is visible (red arrow), below which are a small clusters of rocks is visible in all of the images.
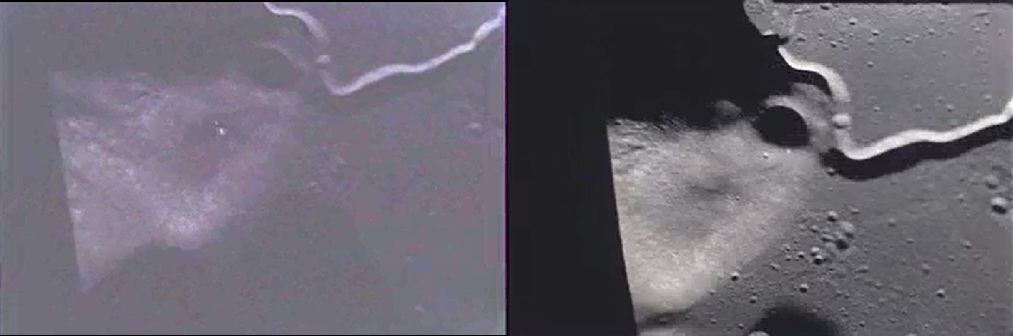
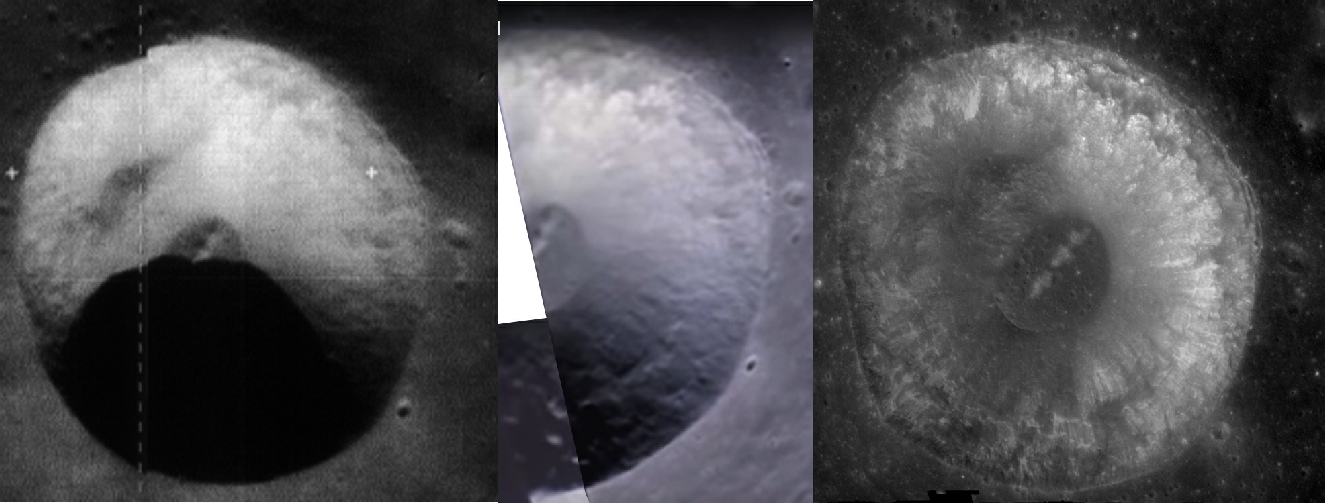
Compare this with LO5’s view (below left), which isn’t even as good as the LM’s incoming view (below centre, AS15-
It’s interesting to see that while LO5 provides a view of Eagle Nest and Pluton that identifies the main features (ie the craters themselves and the smaller craters on the respective crater edges, it does not give as clear an image as the LM Hasselblad on its way down to the surface. Even the LM view (taken at considerably lower altitude than LO5) does not reveal the detail of rocks and small craters visible in the Apollo and LRO and Chandrayaan views. Even a camera just a few thousand feet above the surface has not captured the details seen in photographs taken on the ground that are verified as accurate 40 years later.
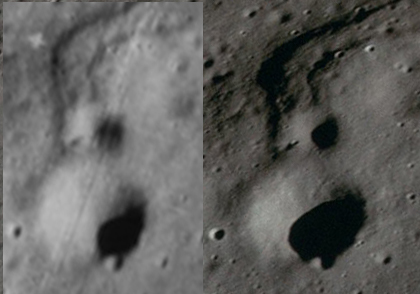
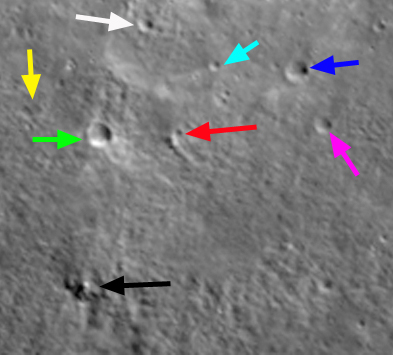
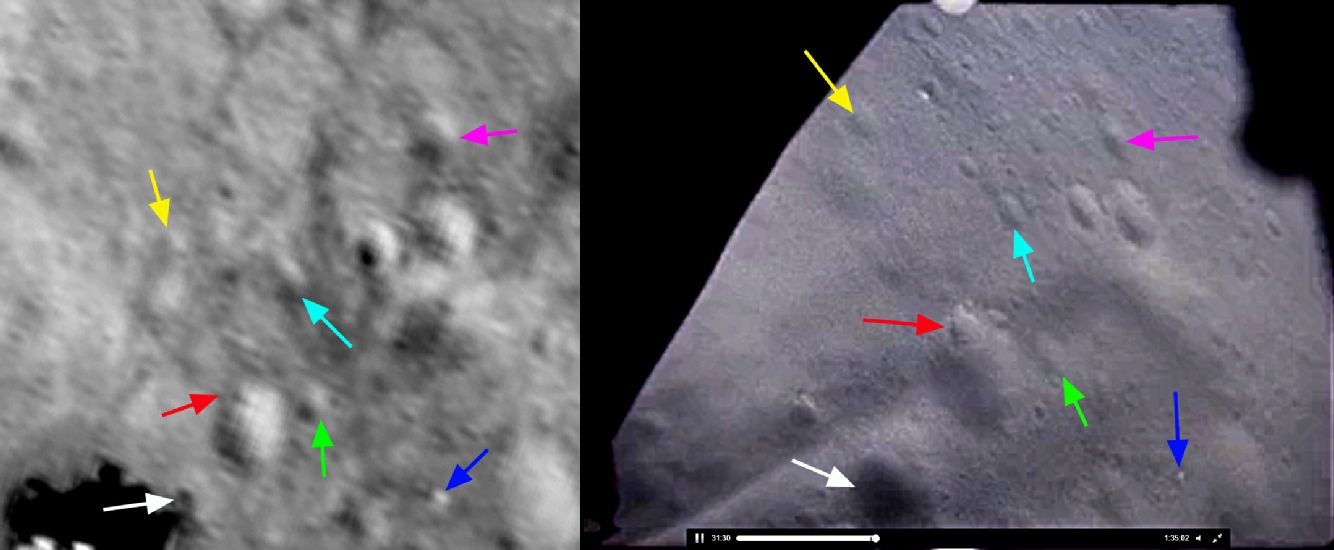
The main features to look for when comparing the Apollo and LRO images occupy the back wall of Chain. In the centre of the Apollo panorama are two round craters almost one above the other (the top is is picked out by the red arrow). To the left of this pair is a crater of similar size (partially obscured by a Reseau mark), and below which are a couple of large boulders (pink arrow). To the right of the vertical pair are a couple of smaller craters, followed by a small boulder field (green arrow).
In the two LRO views, the crater with the two boulders below it can be seen pretty much in the centre of the crater edge, just to the right of centre at the top of each image. In the vertical LRO view, this crater-
Now try finding these features on the LO5 view.
In your own time obviously.
I’ll give anyone who doubts the Apollo landings a little more time.
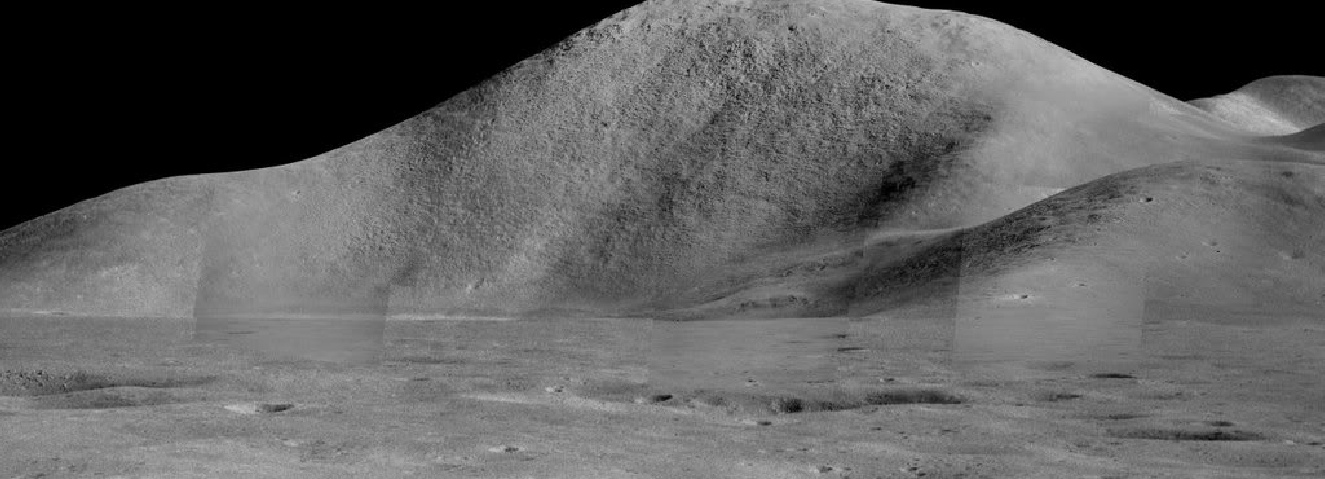
While we’re waiting for them to catch up, let’s have a look at Mons Hadley itself. It was photographed several times over the mission, and in great detail by a series of shots that have been combined to make a composite image. A high resolution version of that image is available here.

We get another glimpse of Dune crater in the 16mm footage taken on EVA2 as the LRV moves nack towards the LM.
In the view right we can see the V-
The red and magenta arrows identify the same features as above.
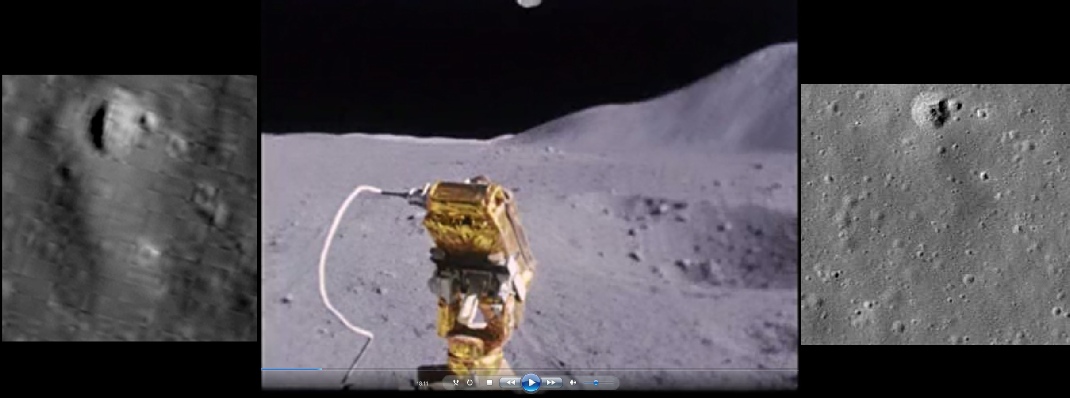
Once again, the evidence is surely incontrovertible, no arrows needed, even in the dark -
We have yet another image of this area that is worth looking at -
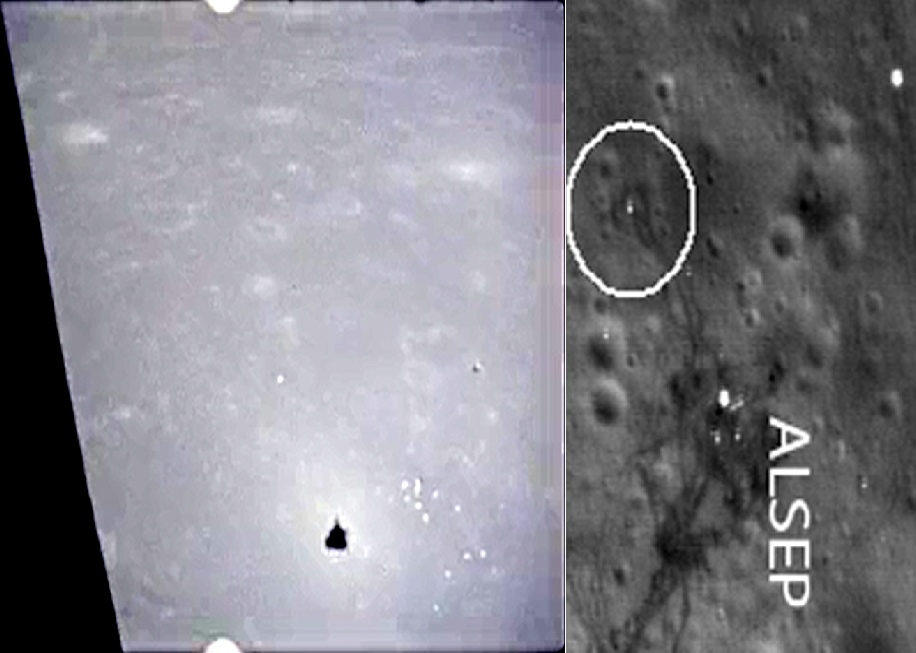
There is another reason why this view has been chosen, and that is the debris seen in the foreground -
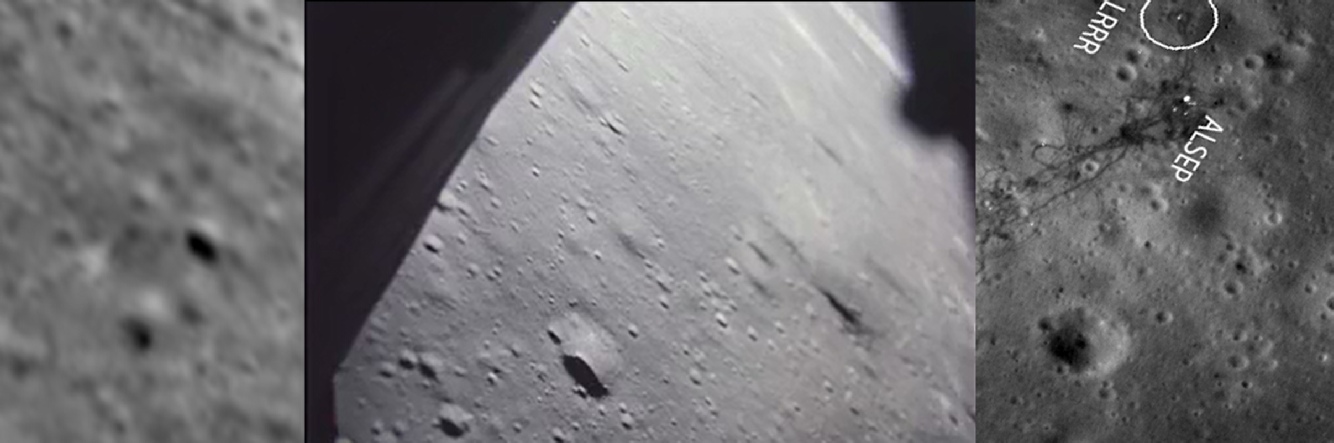
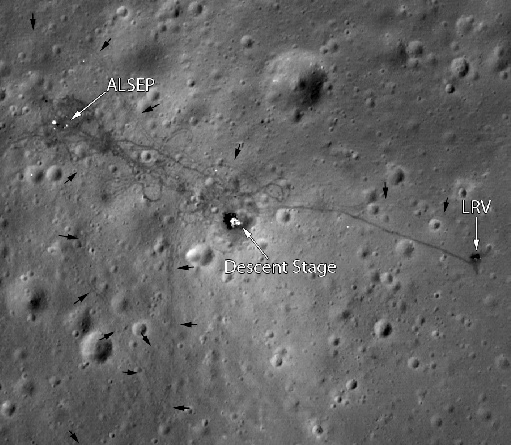
If the launch video is watched carefully, you can see the largest piece of material finally come to rest just beyond the ALSEP. The image below shows another launch still, and the foil can be seen, together with its shadow, just before it comes to rest.
The white circle in the LRO view shows the LRRR, which can be made out to forward and to the left of the ascent module shadow. Immediately to the right of this shadow is the ALSEP. Beyond that in the distance, and level with the the LRRR, is the still moving foil. In the LRO view above, the white dot in the top right corner is the foil finally at rest. Below and to the left of the foil is a large crater with 3 smaller craters arranged around the edge of it. It is this collection of craters that the foil is pictured next to in the 16mm still.
National Geographic also put together a composite view in their February 1972 edition, as can be seen on this site. So these views have self-
So, if it’s all fake then you shouldn’t be able to find any features on that image on any of the LRO views. Below that are the same features identified on the composite image, and at the bottom the same features from the image used as the Biomedical Results Report.
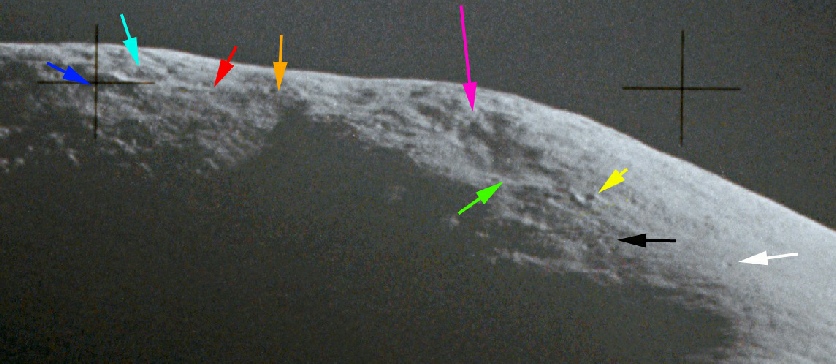
So it looks like while the person who designed the cover for the Biomedical Results report used a bit of poetic licence in order to improve the aesthetics of the image (or may even have believed the extra slope is actually there), they also managed to include details not visible in the Lunar Orbiter images but clearly visible in the LRO shots. Impressive.
Some conspiracy theorists claim that there is proof that the Hadley photo is a model, when actually they’re citing a USGS study that built a model using the Apollo data to see if the patterns of the face of Mons Hadley were strata or a lighting effect. It’s alighting effect, and they had to have the Apollo data to prove that! See here for more information on that.
But wait -
As dsicussed above, in 2009 India’s Chandrayaan-
I did that, and grabbed the relevant orbit for the Mons Hadley area. Using the software they supply on their website, you can extract segments of the image that are of a more manageable size.
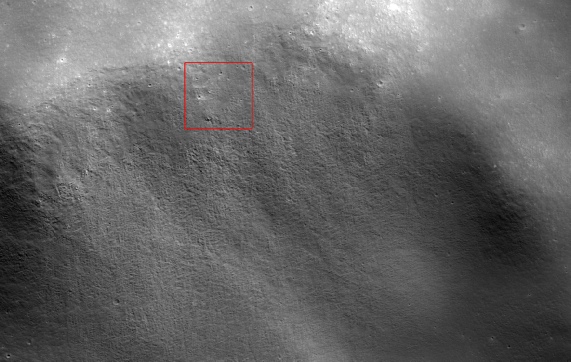
After doing that, what does Mons Hadley look like? Well, here’s the Apollo view of it compared with Chandrayaan, each with a red square to identify the area on which we are going to focus.
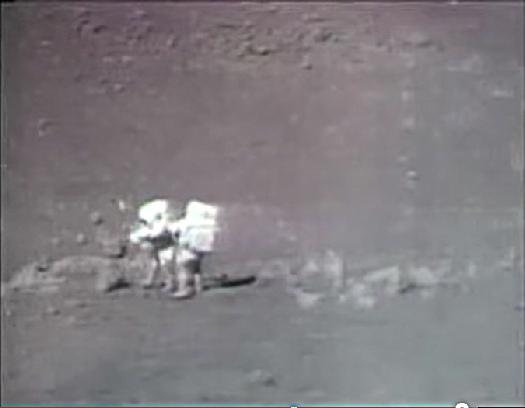
One final view occurs some time after take-
If it looks familiar it should. On the left of the still is the same area examined above from many angles on the ground, showing in video form rocks and small craters that can’t have been seen any other way than by actually being there.
The LRO companion to this still is shown on the right, and the smallest boulder can be made out with complete clarity.
The reason for this? It was taken on the way home from the Moon.
Ahhh but there’s more.
Once again we can call on independent verification by both Chandrayaans and its image of the rille (1 below left, 2 below centre), and also Danuri (below right).
We also have a more recent image taken from the same direction. The full image is here, and an article based on it is here. A crop of the LROC browser is shown below.
The perspective is distorted in the original and I have stretched it to appear the same as the website article.
We have a slightly less detailed view from the second oblique as seen on the right, but even this lower resolution one has more detail the the lunar orbiter image, and it is still a perfect match.

The book image was taken on my phone. I’ve level adjusted both to increase the contrast, but done nothing else. I’m sure I don’t need to point out to anyone that they are identical.
Now, let’s have a look at the LRO view of this same spot -
Just for fun, let’s use the photo of the book page and compare it with the high resolution oblique above.
Despite the lower resolution of the LRO image it is still possible to make out the rocks identified in the Apollo imagery, rocks not in the least bit visible in the lunar orbiter view of the rille.
We can also try the Danuri photograph to see if we can see the same features.
But wait, I hear the morons cry, that magazine has no pictures of people or equipment in it -
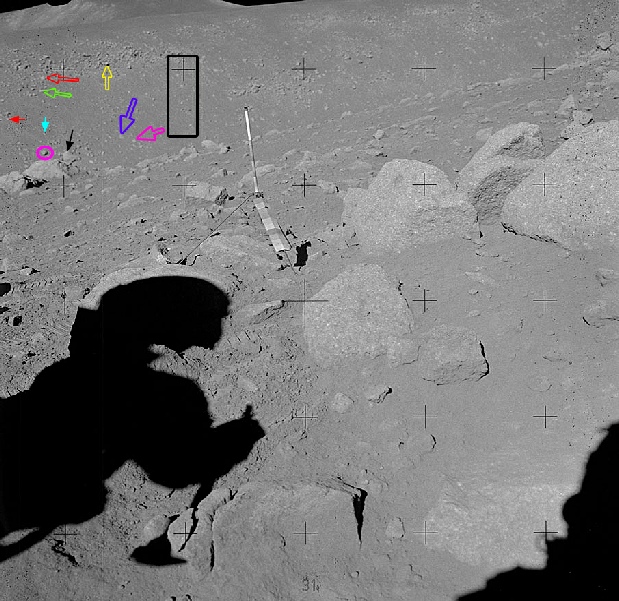
Well that’s fine and dandy, you go ahead and think that, meanwhile the sane among is will look at things like the image below. It’s a partial panorama taken from Station 9a. The original one at the ALSJ isn’t good enough to show what we need to see, so I redid it myself in part using the high definition ones available there.
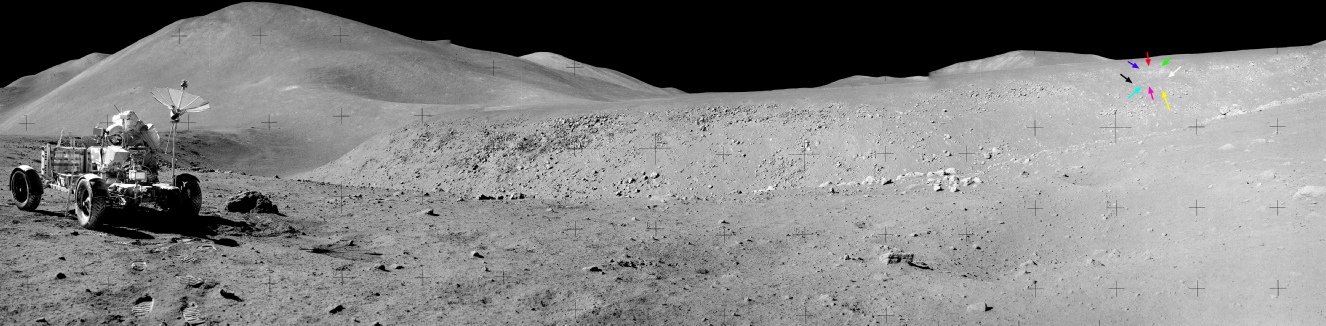
The arrows you’re looking for are over there on the right. Here they are in close up.
Same arrows, different perspective, with an astronaut and a rover in shot.
Now let’s look at the LRO view.
It’s worth pointing out first that the rocks in the bottom right of the TV pan are on the edge of the rille closest to the camera and are difficult to identify exactly in the LRO view thanks to their proximity to the camera and the viewing angle. They can, however, be identified in the Apollo pan as the line of paler rocks right of centre along the rille rim.
Just to add further emphasis, we can even match these arrows with the oblique view shown right at the start. In the image below I’ve added the multi-
And just for fun here’s a glimpse of a crater they pass on the way to Dune crater.
The view on the left is the stretched oblique used above, the one on the right the new version.
It’s difficult to tell from the more recent LRO view that it is a crater, but the oblique shot shows it more clearly, and the inset crater on the far wall is easy to identify. Sadly the rocks are too small to be made out on the LRO views, but you can’t have everything.
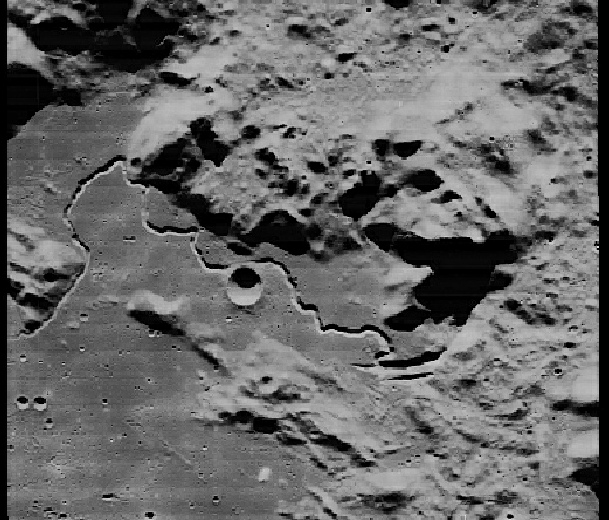
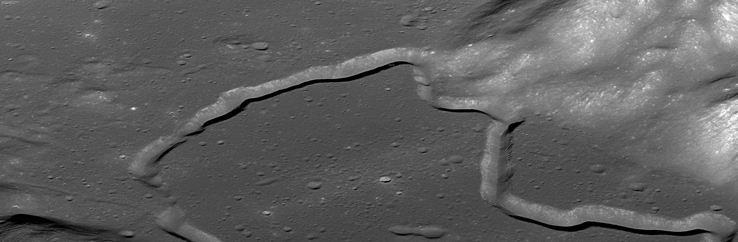
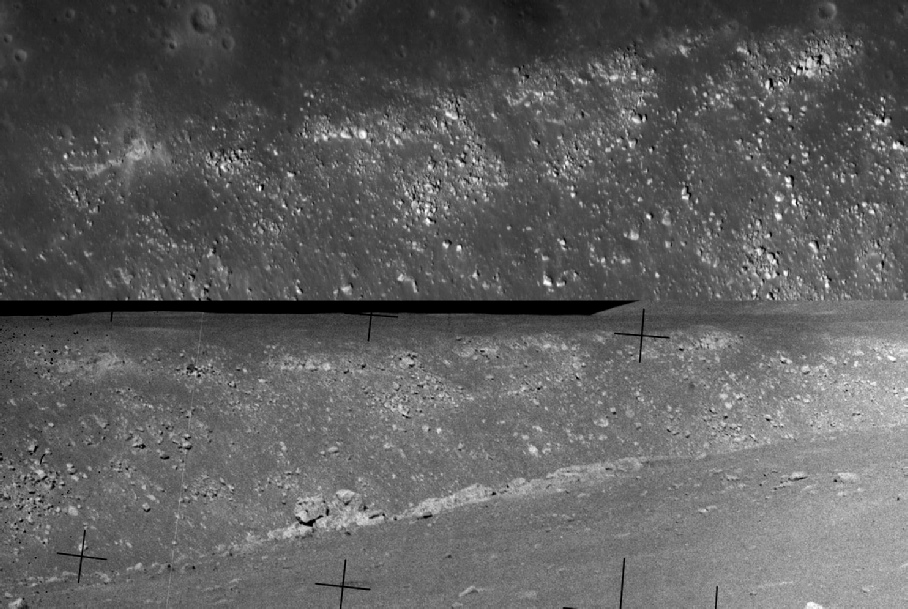
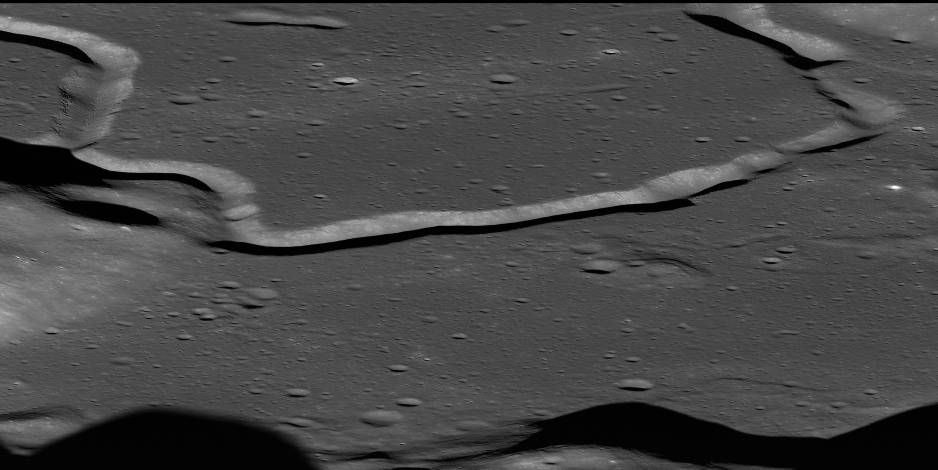
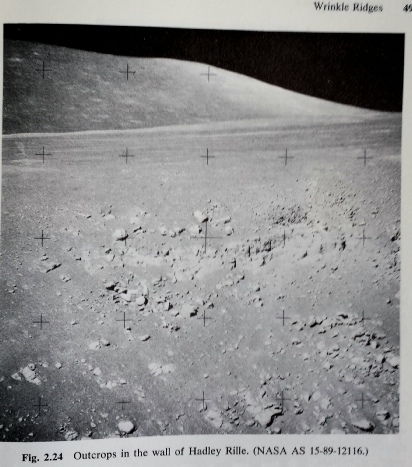
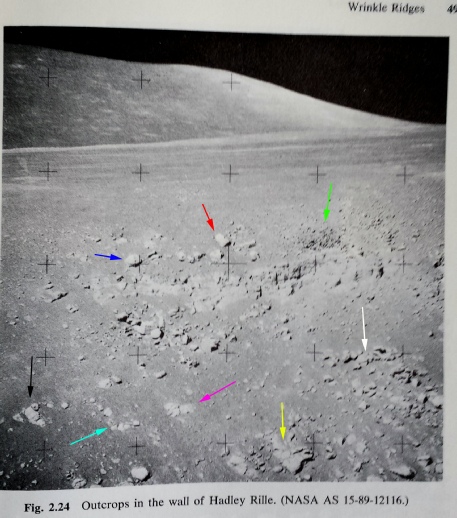
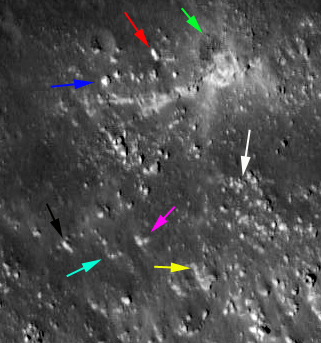
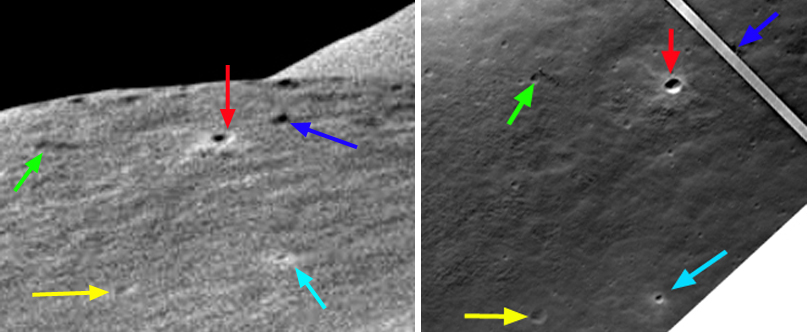
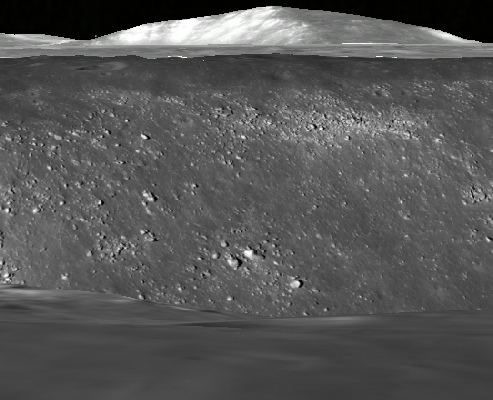
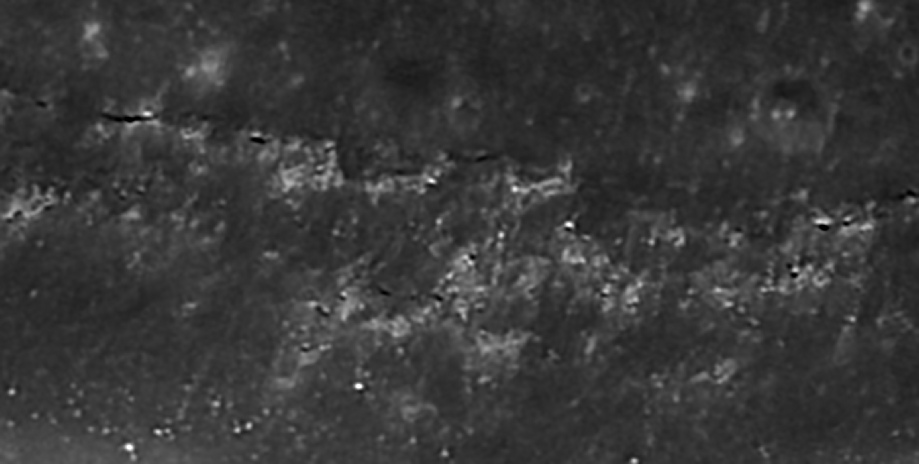
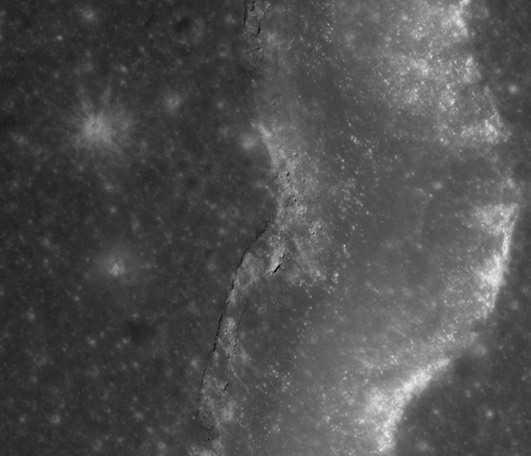
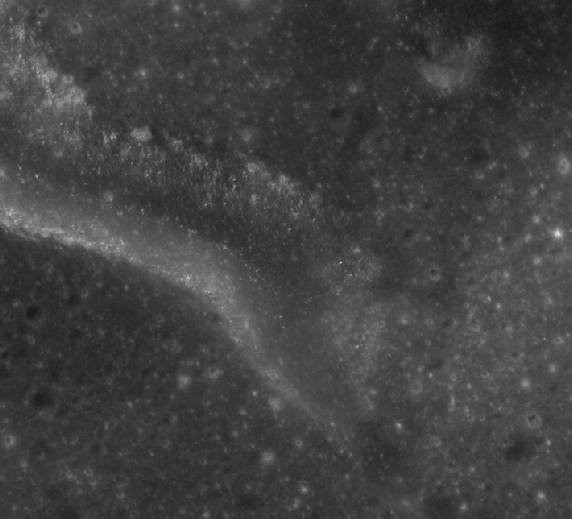
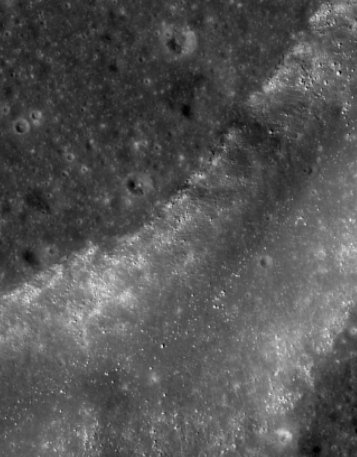
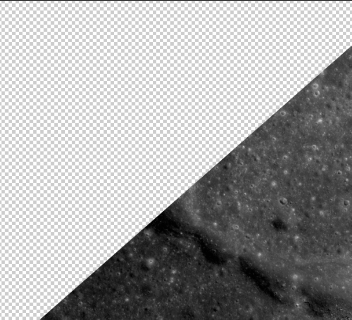
One last comparison from the EVAs can be had from the rille itself. A number of LRO views can be had of the rille without any of the shadowing that makes the LO5 and previously used LRO views difficult to compare. One such view is this one, and a section of it can be examined alongside part of this panorama of the western wall of the rille. The same area seen in the LO5 photograph is shown on the right.


How do those areas compare in close-
Wow would you look at that: an Indian probe, and a Korean probe, not NASA, confirms details that are not seen on Mons Hadley before Apollo landed there, because that face of Mons Hadley is in shadow on the LO images!
Stopping with Chandrayaan for a while, there is another area from the same orbital pass that is also covered by Apollo, and it’s a view that has been cited as evidence of a conspiracy by disingenuous lying morons. In this ‘evidence’, AS15-
It is, obviously, a lie. It is not a painted backdrop. If it is a painted backdrop you have to ask where they got the detail for it, given that the LO images show the slopes in question to be in shadow. So, how can we show this with Chandrayaan views? I’ve joined AS15-
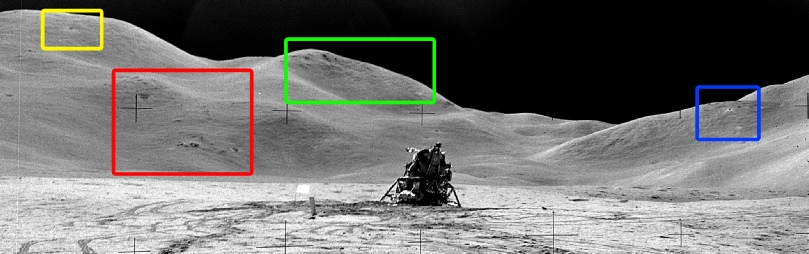
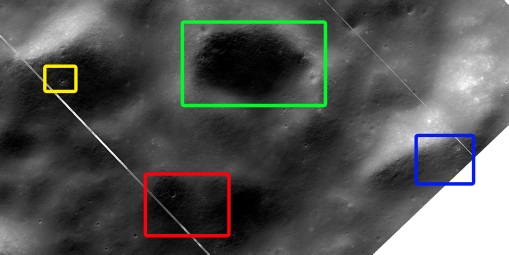
Now let’s have a look inside those boxes!
First blue:
Now red:
Green:
Yellow
So there we are, 4 chunks of Apollo image, matched with 4 chunks of a Chandrayaan image. The Chandrayaan views are showing much less detail generally than the LRO equivalent, but the features we are identifying are much further from the LM than we have looked at so far.
The key point is that they are showing features that are completely in the shade on the Lunar Orbiter views -
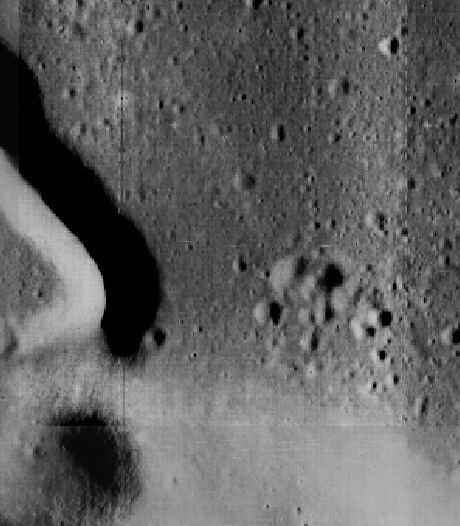
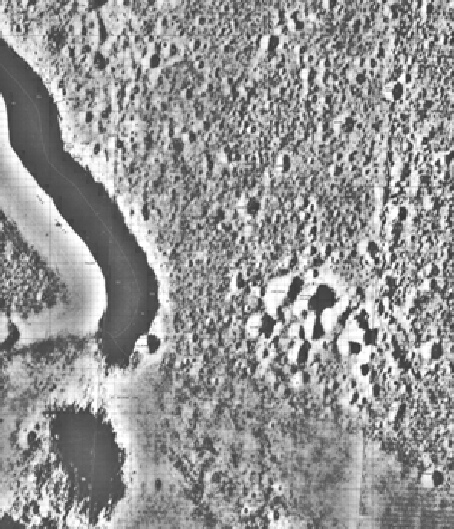
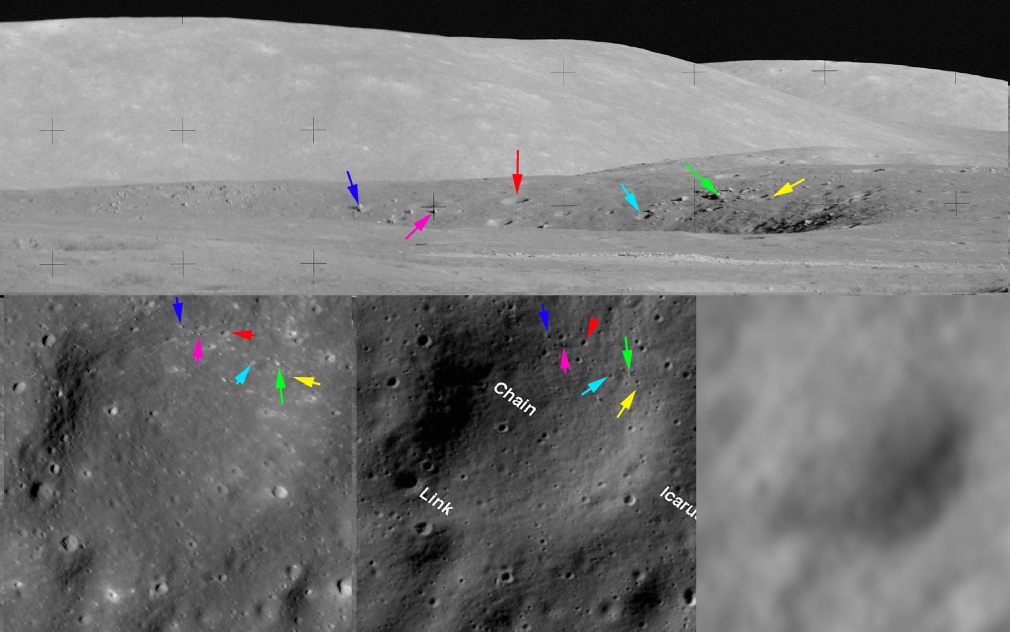
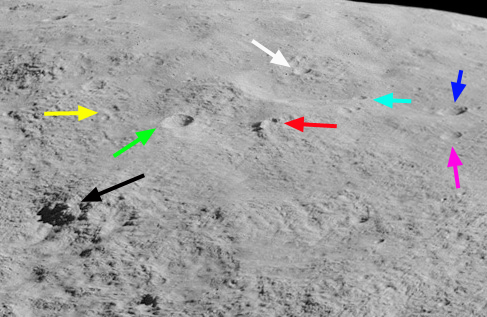
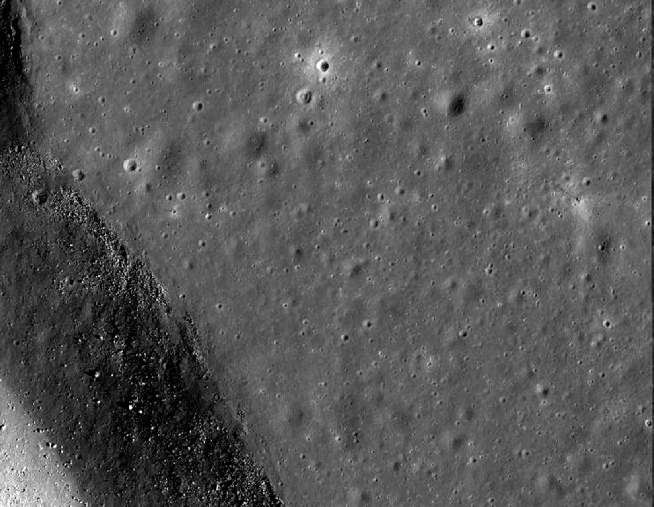
At the other end of the zone of operations is the South Complex, another collection of craters and uneven ground. One of the craters in that complex is ‘Dune’. A panorama exists of this crater, and this is shown below with the two LRO views and the LO5 photograph.
The best way to orient yourself here is to pick out the 4 craters in the bottom right of each image and then work your way around. The twin crater below centre can still be made out despite the astronaut trails, as can the chains of small craters and depressions towards the top of the photographs. The actual landing point is just out of view on the LRO photograph in the bottom left.
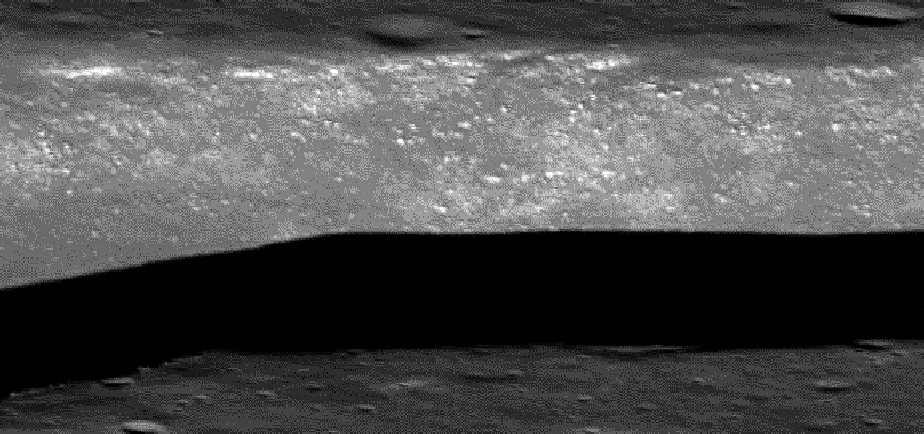
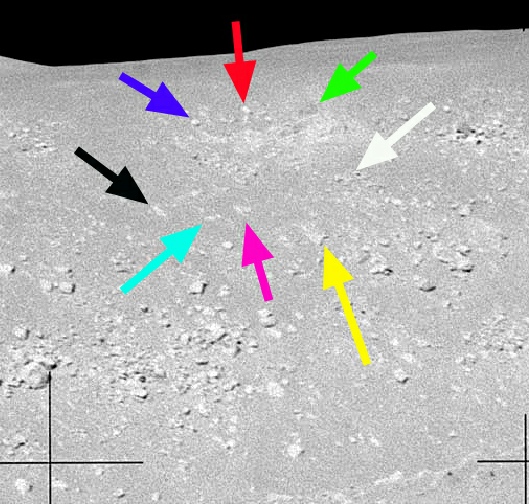
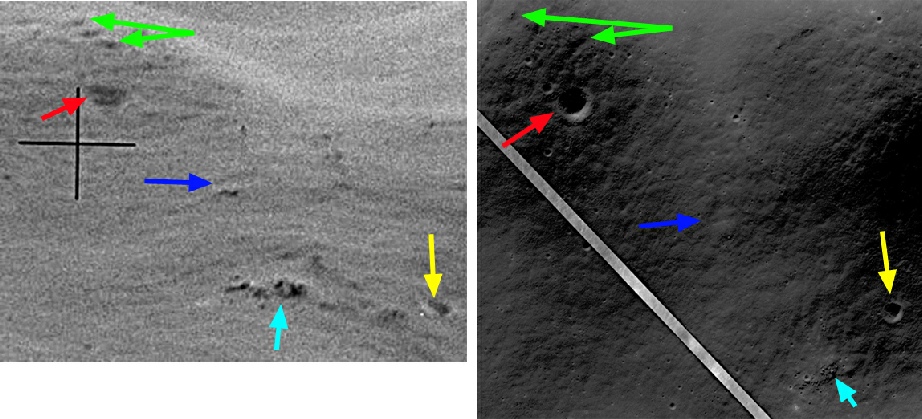
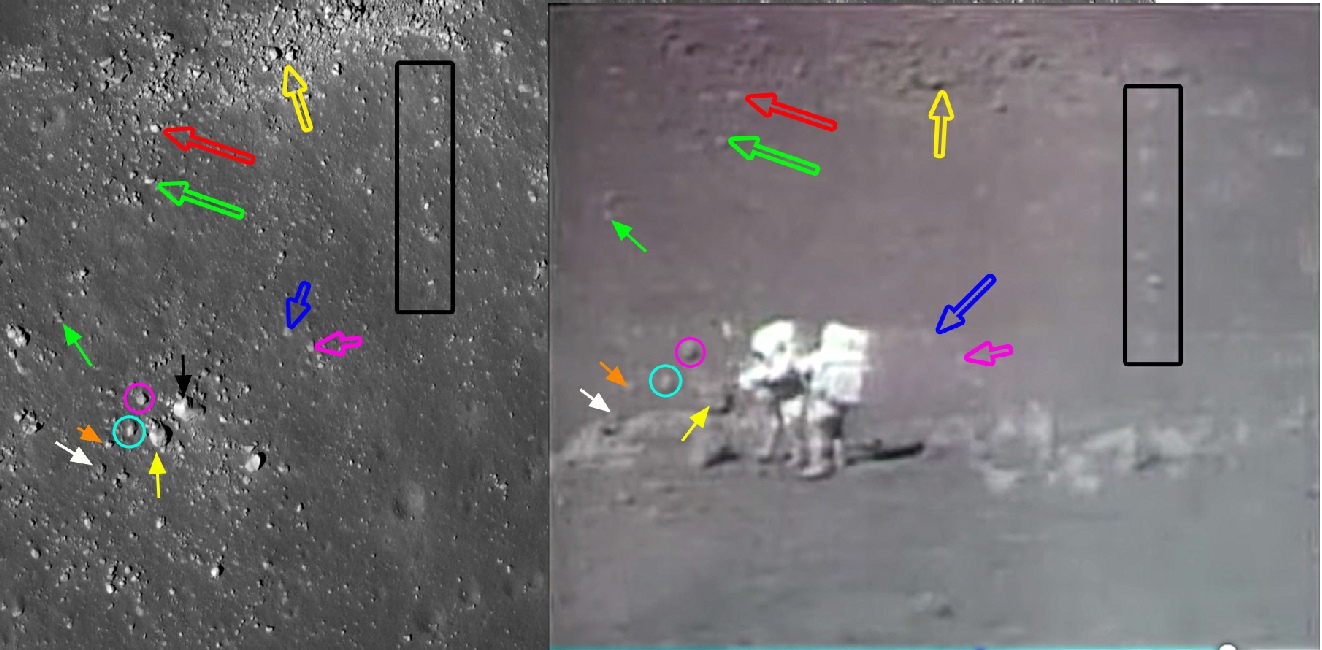
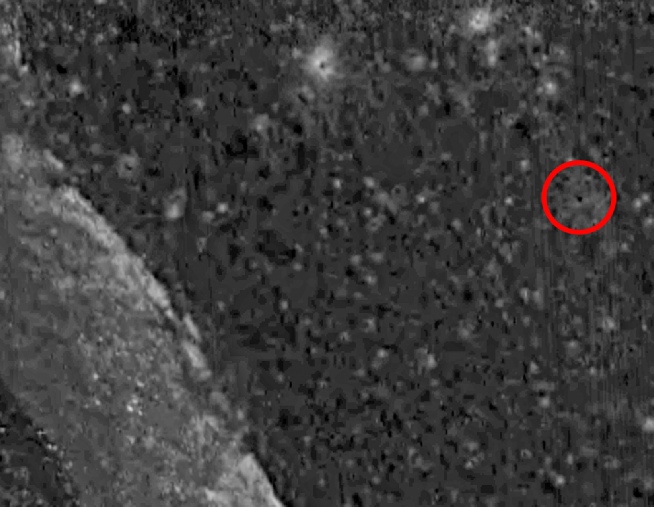
Now let’s get right in amongst them, and look at how the LRO compares with the view just before it gets completely obliterated by the dust kicked up by the exhaust.
It should again be obvious that the the features seen almost at the point of landing are still visible in the LRO image, and could not possibly have been known about in advance of the mission. It’s worth pointing out th dark spot between the yellow and light blue arrows that only appears on the LRO image. This is likely to be the disturbed ground around the location of the solar wind composition experiment, which was returned to Earth and is not therefore visible in any of the final images of the site.
If you think these craters can be found in the LO5 view, be my guest, but until a better quality reproduction of the original images are produced proving otherwise, there is absolutely no way that the details visible in the Apollo video footage can possibly have been produced without actually being there. The craters picked out in the landing video are just a few feet across, and they can be found accurately represented in a photograph from a probe that didn’t see the landing site again for another forty years.
One feature of the descent process that has been discussed many times in both scientific and conspiratard realms alike is the impact of the descent engine burn on the lunar surface. Where is the evidence of the burn they cry, why can’t we see it in photographs? A number of studies have been done on this, and as well as evidence of the plume being found for Apollo 12, two studies confirm its existence for Apollo 15. One covers Japan’s probe data, the other India’s. You can find data on Japan’s evidence here, and India’s here.
What starts to get interesting is when you line up the Apollo site as seen from the LRO and those taken by India and by Japan. It’s worth noting before we do so that the images I am using here are relatively low resolution ones from the articles and reports, not the full sized high resolution ones.
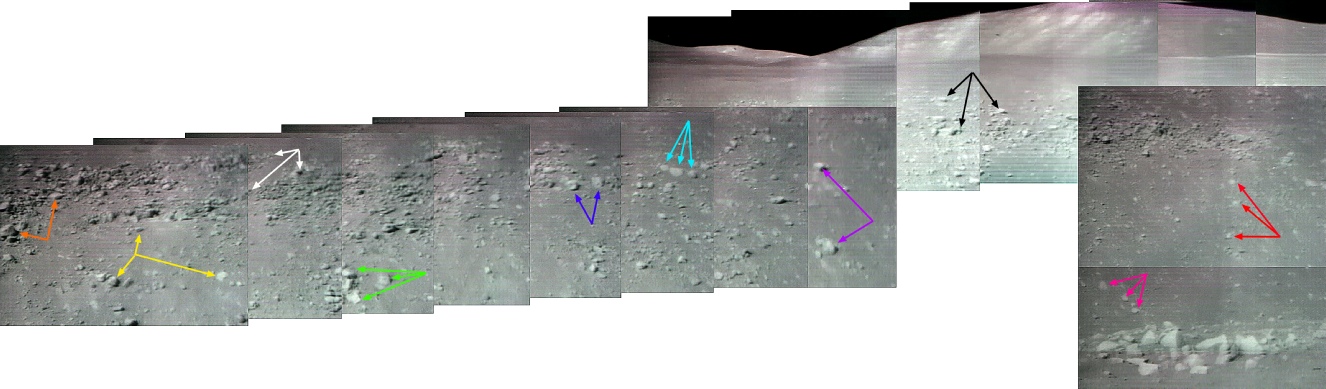
To make it even more unlikely that such a scene was built in a studio, we have the evidence of the 16mm footage taken as the ascent module is launched back into orbit. A couple of panoramas have been assembled of the view from the LM after all the EVAs had been done, but the view from the LM as it heads upwards in an uncut video sequence showing the landscape below is even more convincing.
So, first things first, can we demonstrate that they are at Hadley Rille?
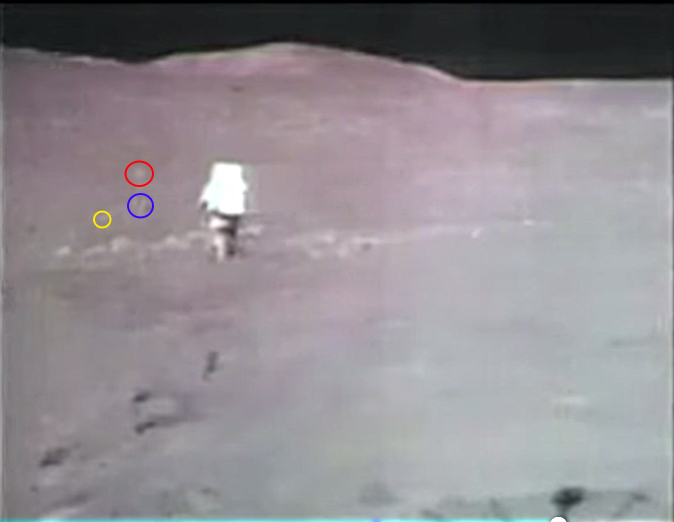
Yes, of course we can. Lets take another screenshot from the same EVA 3 video and see if we can spot where it is on an LRO image.

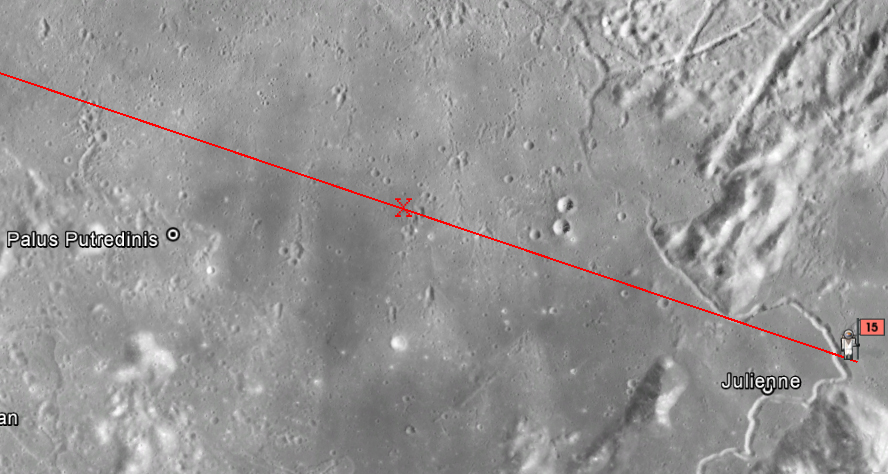
Here’s the area identified on a much larger image of the rille, together with an arrow that points passes through the two clumps of rocks circled in red and blue.
Why is the arrow important? Because it ends at Station 9A, which by an incredible coincidence is where the video still was taken. It’s almost as if they were actually there.

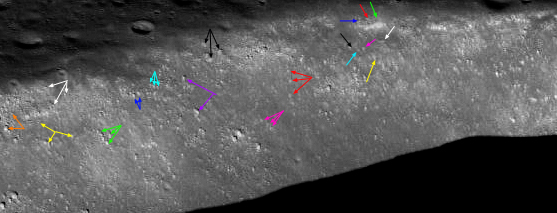
We can take the same LRO image and drape it over Google Moon’s surface at Hadley (below left).
If we zoom in to where Station 9A is and look across, here’s the view. Notice the mountains in the distance. Just for good measure the same area from Chandrayaan-
So far so good. Now let’s look at the screenshot that Adrian was having such difficulty with. What can we see in it? Here it is again, this time with features identified in it from the LRO (left) and Danuri (below right) views and also the Apollo Hasselblad photograph which I’ve zoomed and cropped so you can the area more clearly.
The orbiter view does show a great deal of markings on the crater wall corroborating those of Apollo and Kaguya, but arguably is not as detailed. What is definitely missing from Orbiter is that area in shadow. Apollo and Kaguya both show the same level of detail in their lit part that is hidden in Luna Orbiter. Why? Because they both show images shot above the moon.
Seriously, how much more do you want? We have Japanese, Chinese and Indian probes all showing that the Apollo images are completely accurate and show things that they could not have known without going. The best lunar orbiter photographs can only show broad outlines and larger craters, not individual rocks. Even if it were higher resolution it would still show us the details of that part of the rille that is in shadow.
Speaking of China…
The view from China
So, we can be pretty clear that we are looking at the same area of Hadley Rille, and we can also be absolutely certain that it is actually Hadley Rille, not a sound stage as Adrian claims.
What about those mountains though? The charitable conclusion is that Adrian maybe hasn’t seen all of the video. If he had, he would have seen this bit.
It’s zoomed out more so less detail is available for us but the large clumps of rocks identified earlier can be seen, and the rocks towards which the astronaut is walking towards on the edge of the rille are the same in the close up and distant shot. So there we have it. Mountains in the distance and rocks that are visible in TV and still images from Apollo and on photographs taken by the LRO.
And just in case anyone is still out there moaning about it all being American/NASA data, just as with Mons Hadley, and other parts of the rille, India’s Chandrayaan-
An image from that is available in this conference presentation. Here’s a close up of the area above from the TMC camera.

Besides the panoramic cameras, there are numerous views of the Hadley Rille site that have been compiled into the kind of panoramas that have been useful so far, and we will examine a small number of these presently. Some research has already been done identifying various rocks and craters seen in LRO and Apollo photos, such as at the ALSJ, and while we won’t repeat what they have done, we can have a look from a slightly different angle.
For our first image, let’s look at one of the first the first panorama given in the ALSJ, which is of Pluton crater, and the higher ‘Eagle Nest’ crater. These craters are part of what is termed the ‘North Complex’, a collection of craters on ground elevated about the surrounding relatively level ground. We have a couple of LRO views available of the crater complex. An oblique view looks across the Apollo 15 area, and it’s worth comparing that view with that a section of that seen by the LM as it approaches its landing point from the opposite direction (below right, AS15-
I’ve lined the images from Japan and India up using craters in the image, and there is no doubt that there is a darkened area in the centre corresponding to the exact location of the LM. Let’s zoom in a little closer.
What becomes even more amazingly clear here is that in Kaguya’s view, on the right, you can also see the darkened area around the ALSEP, and a faint hint of the path connecting the two.

So far so good, but so what? Well, the LRO archive, hosted by the ASU, ha very high resolution scans of the Panoramic Camera images, and you can download them. Here’s what happens when you download AS15-
What’s interesting here is that the time the image was taken coincides with the end of EVA-
It is hopefully self-

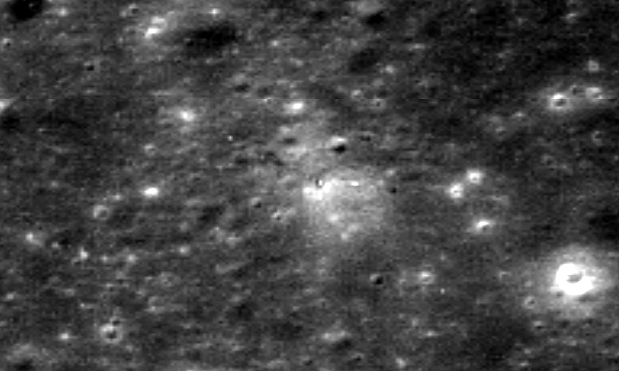
As the LM continues its ascent to orbit it follows a roughly east to west trajectory, and after another 35 miles or so picks up another area covered by a Chandrayaan-
Here’s the path it follows -

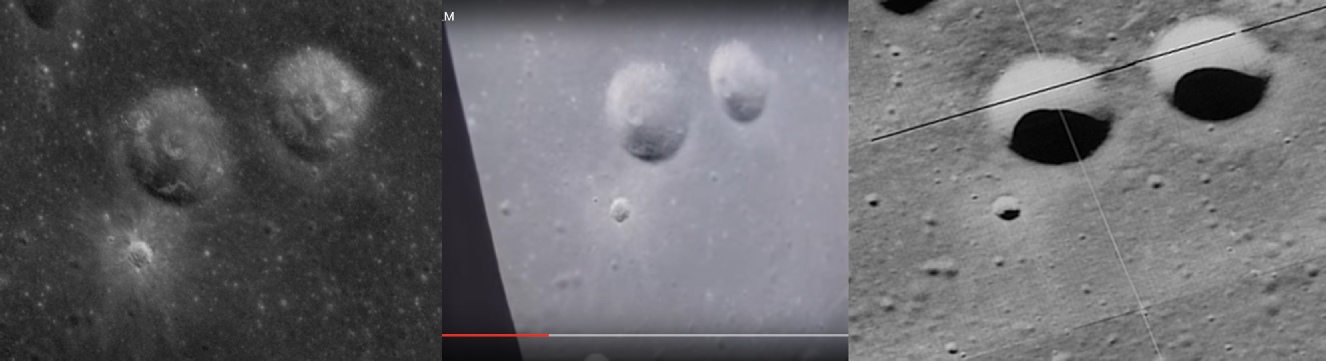
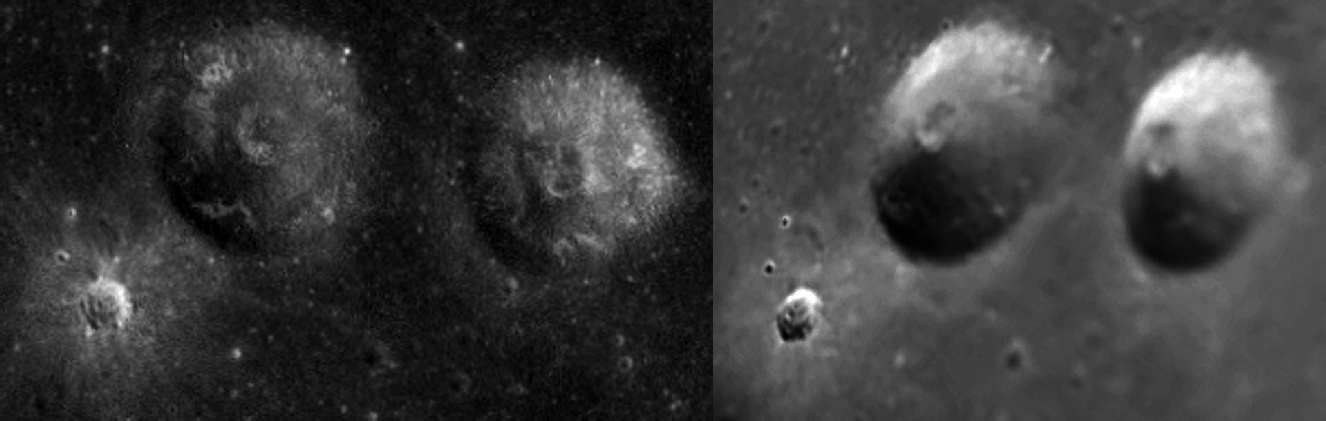
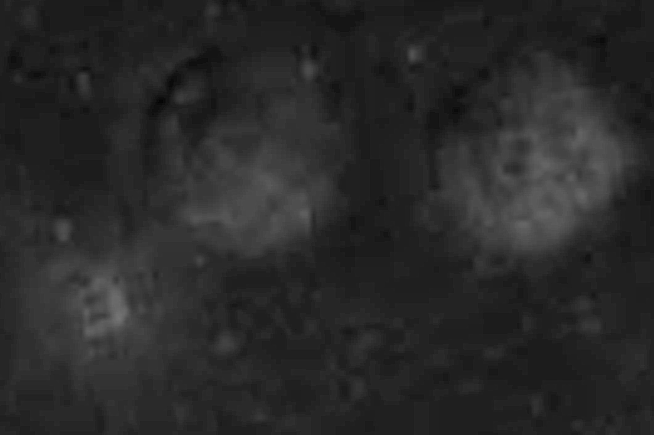
On the face of it there is little different in all three images, but the features that do vary between them are the bright fresh craters dotted around the images. Some do crop up in the orbiter views, but several do not. Notable missing is the one related to the central crater of the three larger ones. Here they are in more detail:
While the LO view does see that a crater is there, it very obviously doesn’t pick out the fact that it is a bright high albedo feature as Apollo and Chandrayaan do.


You can argue that the two bright spots in the lower left of the LO image can just be made out, but not the two in the upper right.
As Falcon continues its ascent to orbit it moves out of the area covered by this orbiter photograph and into an area with even less clear pre-
Much of the detail in the Apollo still is lost in the LO4 image, while the Chandrayaan is an exact match -

Before we get there we can look at the Japanese coverage from Kaguya (below left) which we can pick up just as it crosses the rille. The Apollo film is in the centre, and Lunar Orbiter on the right.
A short while later Apollo picks up another part of the rille. Again the Apollo image is flanked by Kaguya on the left and Lunar Orbiter on the right:
We’ll have one more look at a Kaguya image before moving on to the higher resolution Chandrayaan shots.
I’ve used a different Kaguya image type this time in order to reveal details in the crater bottom that isn’t shown otherwise. While Lunar Orbiter shots show the crater bottom in the shade, the Apollo image shows exactly the same details on the crater walls and central mounds that they couldn’t have been aware of before. The ray pattern from the fresher crater is much easier to make out in Kaguya compared with Orbiter and it is an obvious match for the Apollo one.
Not convinced? Here are those craters close up compared with a still from the 16mm footage that I’ve perspective corrected and contrast adjusted to allow comparison. As you can see there are details in the 16mm footage that could not have been seen other than be flying over them.
We now move into the region covered by India’s probe. The best coverage of the start of Chandrayaan’s image from Lunar Orbiter is still 5105, and here we have a crop of the relevant area from lunar orbiter shown (left) with a 16mm still (centre) and Chandrayaan’s view (right).
China’s probe (below left) also has an image of the same craters, and although it is lower resolution you can still make out details in the craters and some of the brighter surface features not shown in the Lunar Orbiter photographs. You can also see them in the Apollo 15 Panoramic Camera images (below right).
While changing altitude means that lunar orbiter images present a much more reliable comparison with Apollo images than at lower levels, there is still no comparison when the centre of craters are in complete shadow. For one final look at Apollo 15’s ascent here is Bancroft crater as shown by Apollo 15 (centre), Lunar Orbiter image IV-

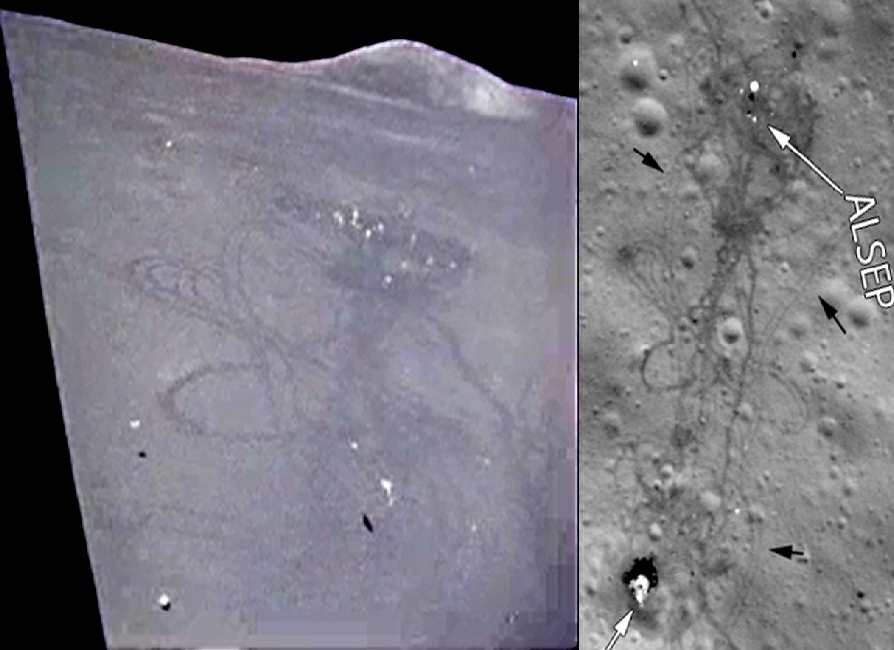
It’s a beautiful site, and sight, but let’s zoom in to the bottom left hand quadrant and see if anything can be found where the LM landed. I’ve included a little of the rille to give the image some context.
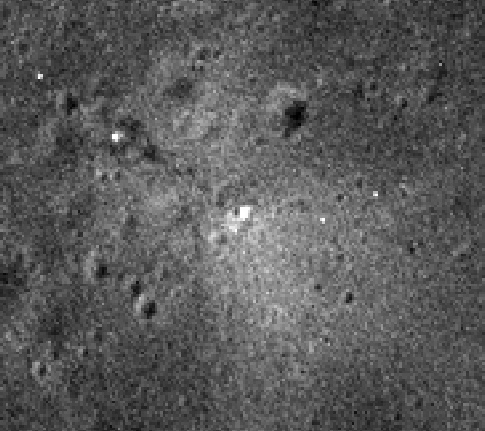
Despite covering a relatively larger area, the dark spot caused by three EVAs’ worth of activity around the LM is very obvious -

There is a suggestion of a trail towards the location of the ALSEP, but the path to, and location of, the LRV is not clear.
It’s worth noting that the rear facing and forward facing ‘.2c’ files in successive orbits confirm the details in the regional tiles.
Had they followed the reference for that image in the article, (that they tellingly do not cite), ie this article, they would have seen these words: “A careful examination of the bottom panel of Figure 3 shows the presence of a rectangular-
Even better, it is now possible to download and process those Chandrayaan-

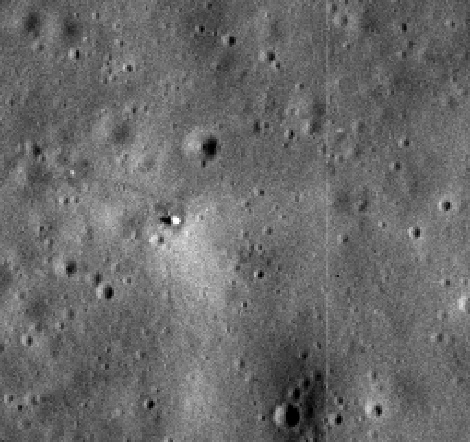
They get the location of the Apollo 15 site wrong, but if we zoom in to where it actually is we can see this (left).
How about we get even closer in:
And Chandrayaan-

As usual the Orbiter image provides the same broad brush strokes as the Apollo footage, but the finer details of the small craters and rocks (eg the one in the rille’s western wall) are missing.
Chandrayaan-
It’s quite obviously the same area, and what we can see now is that as the Apollo LM gains altitude the resolution possible in the 16mm footage starts to match that of the Orbiter photograph. What Orbiter fails to show is some of the detail where light is being reflected, for example on some of the fresher craters and particularly so in the detail on the northern rille wall.
Even the relatively low resolution image published of the rille by Chandrayaan-

Apollo 15
Apollo 15 giveth and taketh away. On the one hand it is the first use of the Lunar rover, and the tracks from it stand out beautifully when viewed from the LRO. On the other, there does not appear to be a high resolution view taken of the Hadley Rille landing site taken by the Lunar Orbiters. Some do exist of some parts of Hadley Rille, but not the landing site specifically. However, this does mean that the claims of the landing deniers become even more difficult to substantiate: the images of the surface will be even less detailed as a result, and the likelihood of there being LRO viewable details being available to anyone other than the astronauts who piloted the LM to the lunar surface becomes even smaller. Apollo 15 giveth right back again.
Before comparing photos of the site, it’s worth looking at a few simulation images made using them. The simulation used a large model of the site shown below (source).
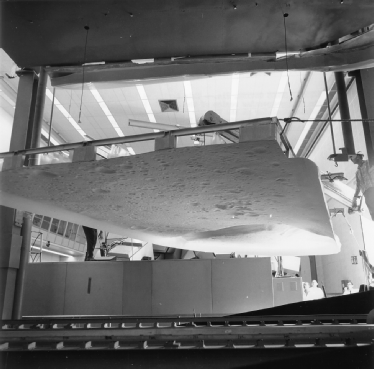
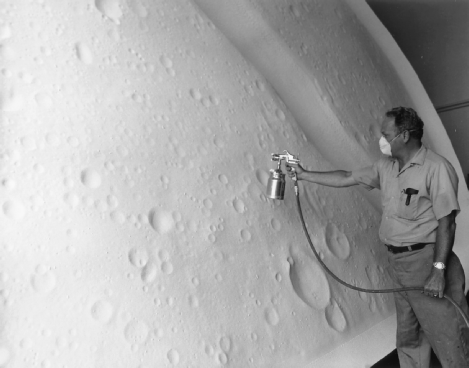
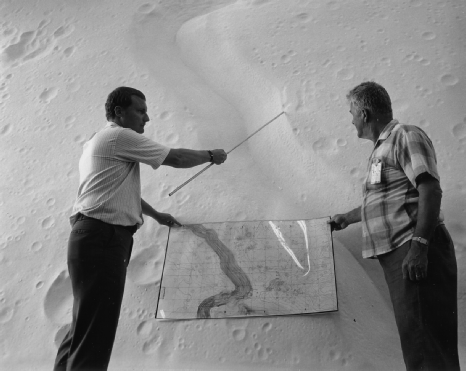
The people in the photographs should give an idea of the scale of the model!
LOLA was a very clever device, constructed so that both the 3D model built using all the data they had to hand and the camera that moved above it could move in response to the simulator controls. The scale was restricted to 1:150 -
Many hoaxtards will claim that it was a secret project, but this is a complete fabrication -
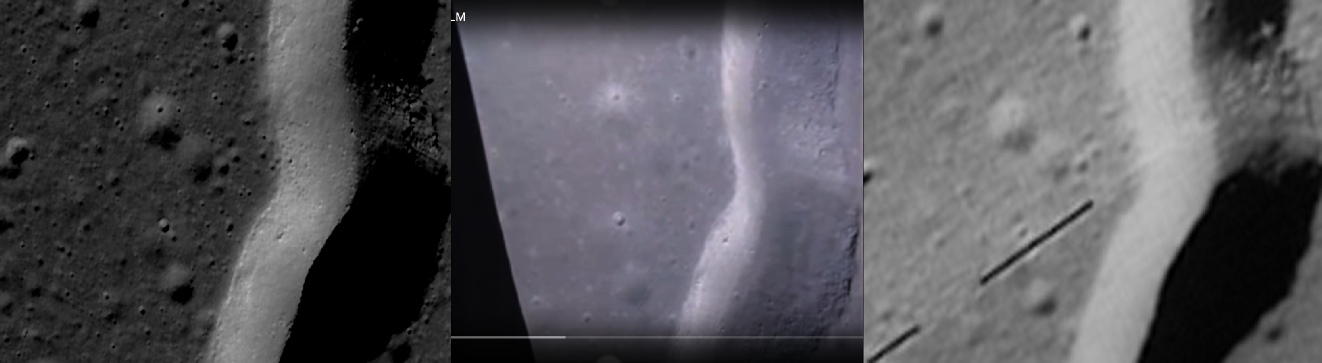
So, let’s look at the evidence and establish what we’re looking at. The first image is from 5000 feet, and I’ve compared it with a view from Google Earth (right) and also the Apollo 15 16mm footage from the 16mm DAC (centre) taken at the point the crew announce ‘5000 feet’.
The LOLA view isn’t bad from this ‘altitude’, and the broader features are easy to make out on Apollo and Google Moon views once you orient yourself correctly.
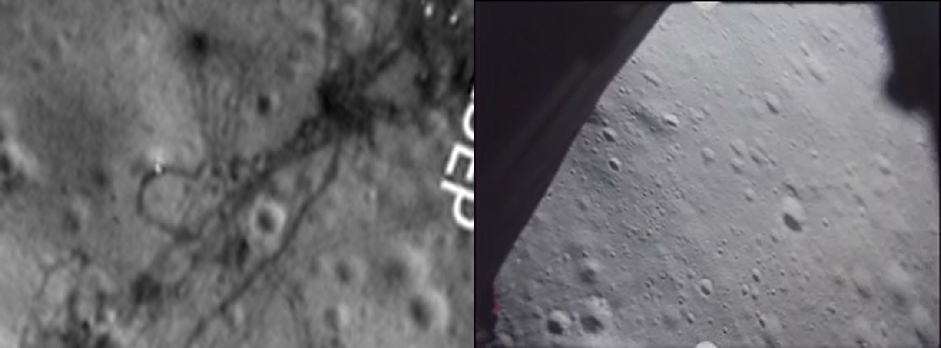
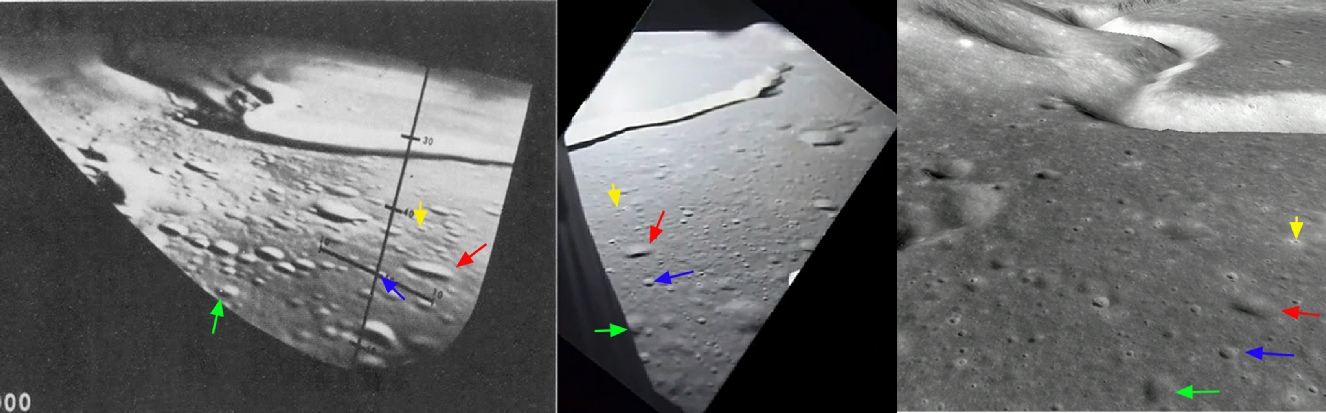
Let’s now descend to 3000 feet.
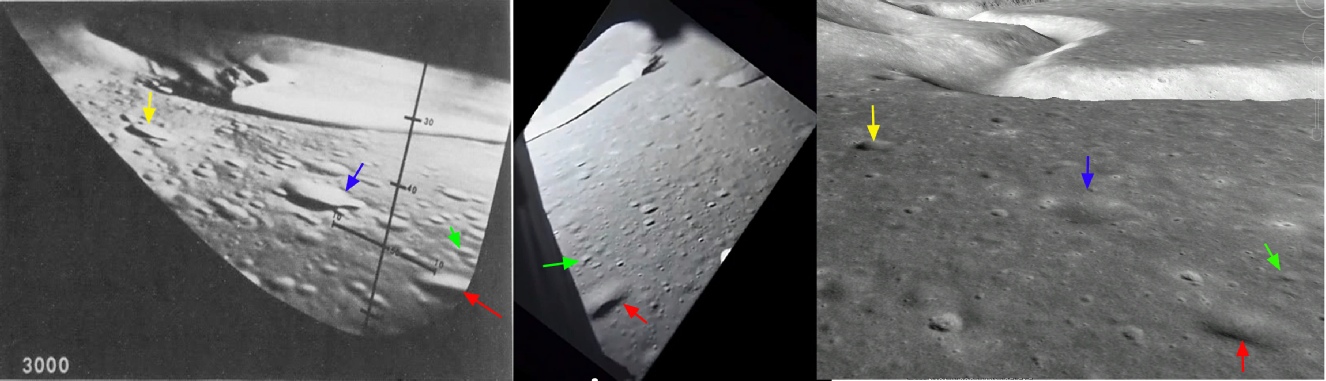
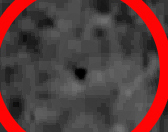
The only arrow pointing to the same feature is the red one, as this is the most obvious one that is visible in all 3 images. We are now starting to see the feature I mentioned earlier. While the camera is descending on the model’s static view, the amount of additional detail being revealed is not increasing. Contrast this with the Apollo image, where the descending camera is moving on on a three dimensional object and more detail is being revealed as it does so.
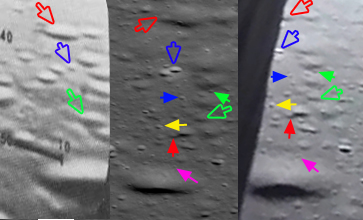
Here is the 3000’ image zoomed and cropped and looking at the crater picked by the red arrow from LOLA (left), Apollo 15 (right), and a more detailed LRO image (centre).
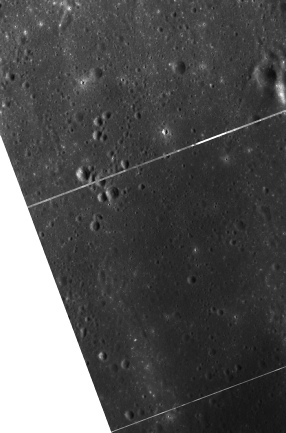
The entire medium resolution image is shown right, and the area covered by the mission is shown below that together with the best quality maps used for the mission, which show details from LO photographs.
The LO5 photo (left) has been contrast adjusted for this exercise in order to improve the visibility of craters, but even after this it does not seem to show the same level of detail as the map, so higher resolution copies may have existed on paper.
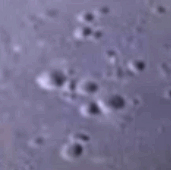
We can do better than that using India’s Chandrayaan probe. Their Terrain Mapping Camera (TMC) carried out detailed surveys of the lunar surface, and while the one specifically covering the Apollo 15 landing site were not available for many years, the images from it are around in a variety of reports.
One of them has this image on the right.
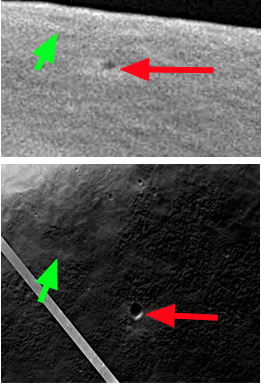
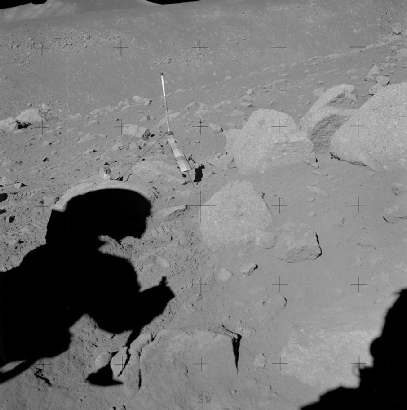
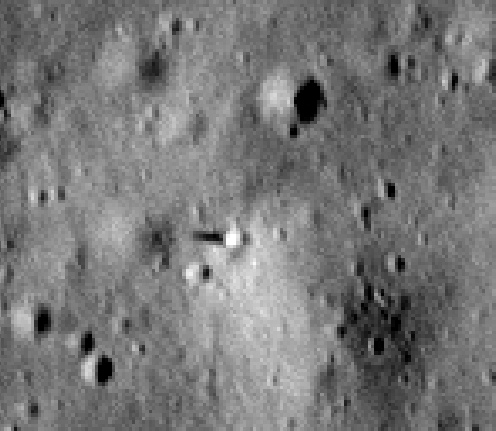
Another interesting feature is the small shape at around 11 o’clock relative to the LM. It is clearly standing proud of the surface, as can be deduced from the direction of the shadow, and it does not appear in the LRO view or indeed any of the other Panoramic Camera images shown below.
The clue to its identity can be found in an Apollo surface image also taken at the end of EVA-
In the comparison to the rightI have zoomed in to the LM and rotated it so that it matches the view south towards St George crater, seen in the background of the surface photograph.
It’s worth comparing this first orbital image with image AS15-
Then there is AS15-
Just around the corner from Pluton is Chain crater, a much shallower depression but still of a decent size. It is also the subject of a panorama that continues on from the one showing Pluton.
As before we can compare the view from two LRO standpoints and that of LO5 to see if we can discern the same level of detail. As the elongated perspective of the 500mm lens used makes it difficult to tell which craters are occupying the foreground, I have cropped the panorama to show just Chain crater.
Bottom left is the oblique view of the crater, but this time it as been rotated and stretched to be the correct orientation and size. In the middle is the vertical view from the LRO, and bottom right is the LO5 picture.
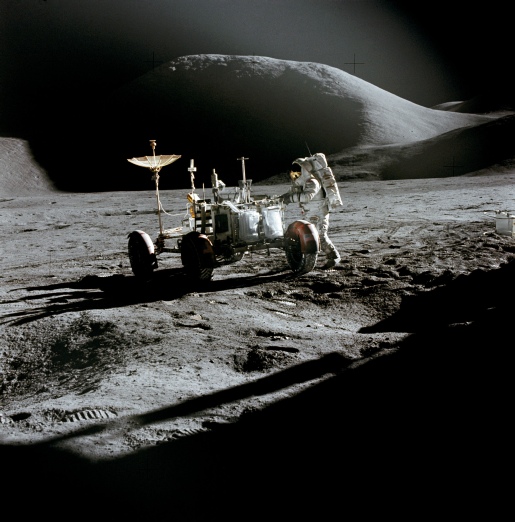
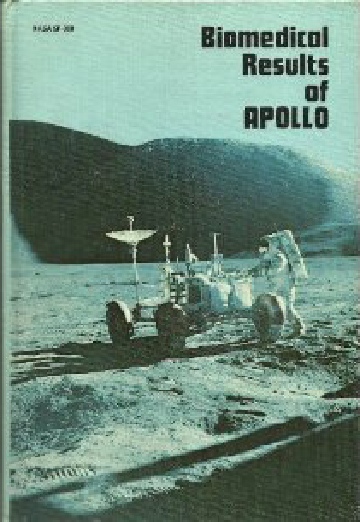
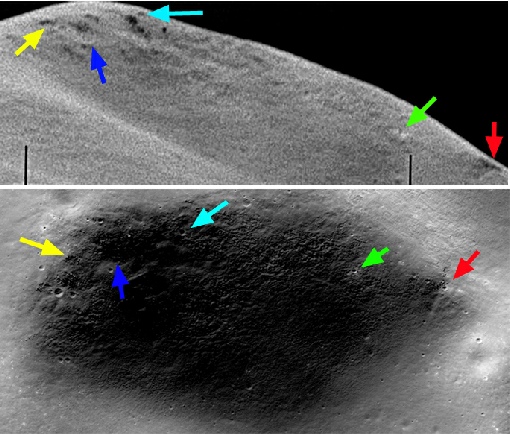
The other reason why Mons Hadley is interesting is thanks to the cover of the Biomedical Results report, which used an image from Apollo 15 (below left, high resolution version here) as the basis for one of the edition’s covers (right).
The report cover shows a hill slope that obviously isn’t there, so “A-
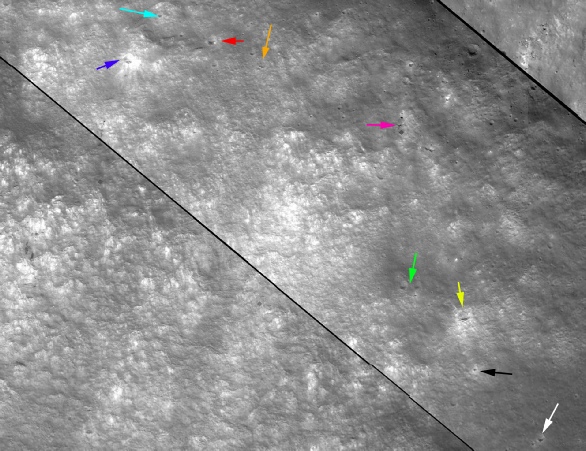
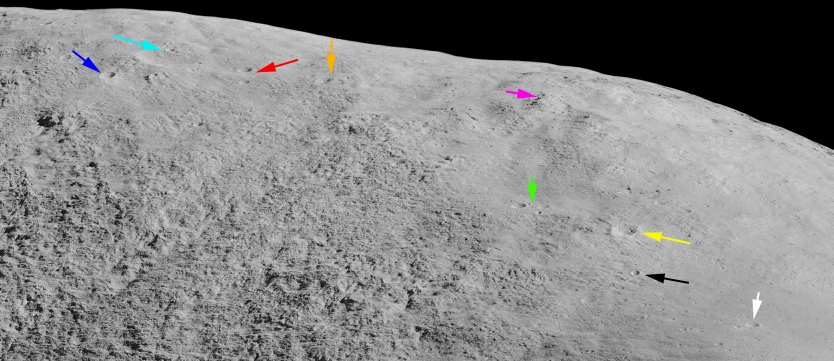
The images on the right shows s a montage of LRO views taken from the quickmap browser with a Lunar Orbiter view shown next to it.
Now let’s look at the same features identified on the composite image on the Apollo photograph (top), and the same features from the image used as the Biomedical Results Report (bottom).
The most identifiable features in the Apollo image are the lines of rocks running from the crater rim downwards forming two ‘V’s (red arrows), and these can be seen easily in both LRO images at the top and centre of the crater.
In the rotated and re-
Also visible between the two Vs in the Apollo panorama is a pair of shallow craters, and once again they can be found in both LRO views, as well as Danuri’s version (left). Chandrayaan-
Again, other details can be found if they are looked for, but not in the LO5 view, which only shows the broad crater outline.
So here we have a photograph taken on the moon in 1971, reproduced in a book in 1975, showing features that could not have been known about -
As always, great minds think alike, and many of the rocks in the image are identified on this LRO page.
Still bitching?
Well, while that rover was parked up there it spent quite some time broadcasting TV images of EVA-
Part of that broadcast involved the Ed Fendell zooming in on the rille to do a panorama of his own.
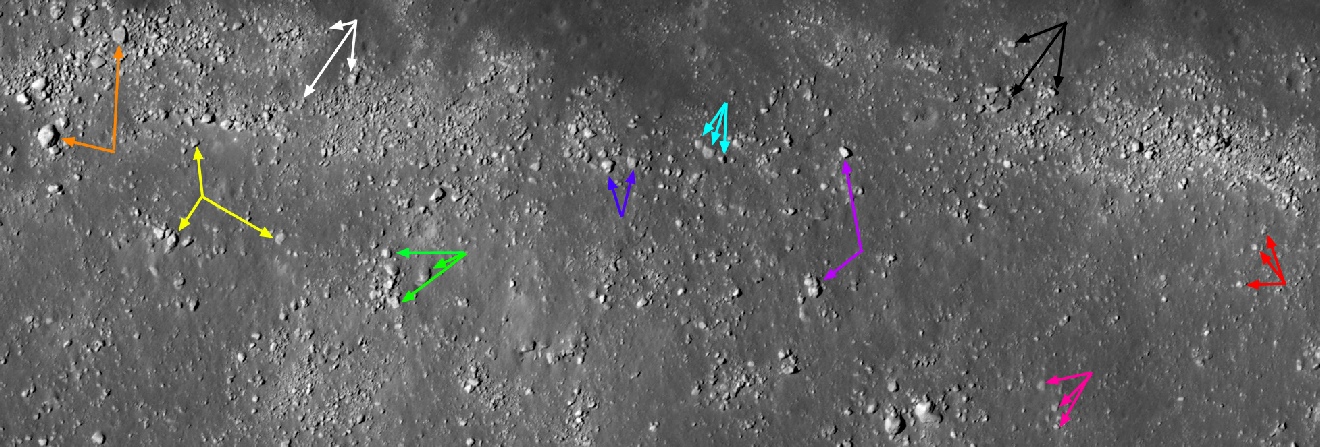
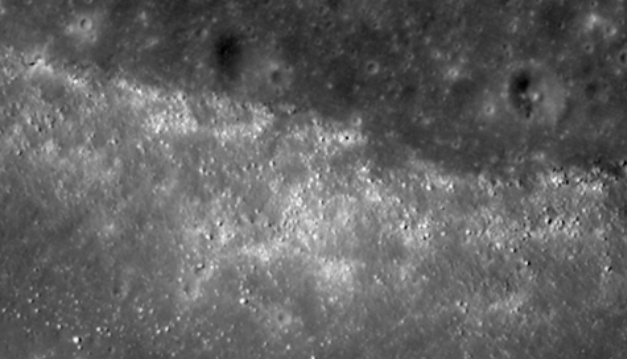
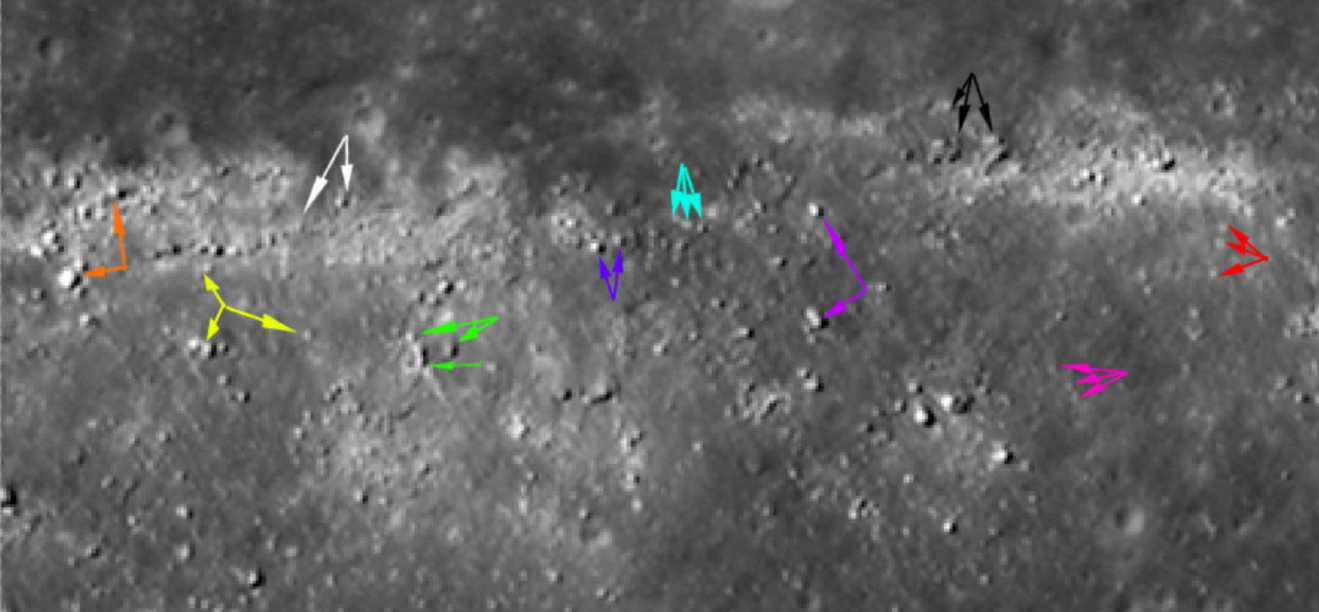
As I am fortunate enough to own Spacecraft Films’ DVD box set of the mission, I took screenshots of that panorama, compiled them, and looked at the same LRO view to see what I could see. Here’s the TV view:
Do you think I’ve identified enough of the rille?
The larger rocks in the foreground are on the near edge of the rille, as opposed to those I’ve picked out in pretty colours which are on the far wall.
The black arrow identifies a rock we will see later.
The solid arrows and the to circles are visible in the previous screenshot we examined, and while camera operator Ed Fendell has zoomed out a little we can still make them out they are obviously the same ones.
The black square outlines a near straight line of smaller rocks, and these can be found on the right hand side of the Google Moon overlay.
We can also identify the same features in the Hasselblad images (see below), so we can be sure that they were in the same place.
As usual, if I can’t be certain of a feature, I have omitted it, but the larger objects are definitely there.
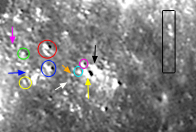
Also shown right is a section of the Danuri image showing the area covered by the blue, red, green and yellow circles.
Who’d have thought it -
Again.
Who’d have thought it -
The 16mm still shows the patterns made by both human feet and the lunar rover, and the match is exact in every detail -
Anyone who doubts that this is the case should watch the video again and see when the foil comes to rest. I should point out that although I found this on my own, other people have already made this discovery, as can be seen here. Great minds.
The same is true of several other craters, for example these:
We can verify this further by zooming in to the main feature of the shot:
In April 2018 China released much higher resolution versions of its images from Chang’e-
You can download the large regional scale files from their interactive map here, but it’s also possible to trawl through their datasets and get the original passes here. The Hadley passes overlapped, so there are 4 files that cover the site (that I’ve found so far).
These filenames are the front and rear facing camera images covering Hadley Rille:
CE2_BMYK_CCD-
CE2_BMYK_CCD-
CE2_BMYK_CCD-
CE2_BMYK_CCD-
Showing that the images were taken over two orbits, which commenced at 04:18 and 06:16 on 22/11/10.
The file can be opened in photoshop providing you can get the image dimensions from the accompanying ‘GEO’ files.
We’ll start with a broad overview of the site from their large scale TIFF tile.

We also have this 2023 image taken by South Korea’s Danuri probe LUTI camera (below left) and Shadowcam under Earthshine conditions (below right).
Despite the lower resolution, all but one feature used as identifiers can be seen in South Korea’s view (a small rock picked out by a white arrow).
We can spend a little more time at the rille to try and rebuff the claims of one particular idiot on the internet.
The website awe130.com has this page, in which the author (let’s call him “Adrian”) claims amongst other things that there should be mountains in the TV footage (which he initially said was 16mm film -


And by way of comparison, here’s the best Lunar Orbiter has to offer (right).

Chandrayaan-
The paths to the LM VIP spot and ALSEP couldn’t be clearer, and couldn’t match the Apollo record better. More from Danuri later!
The JAXA paper linked to earlier contains a reference to an Apollo 15 Panoramic camera image, AS15-

Which kind of screws over the claims of some conspiracy idiots that China are keeping a lid on the fact there were no Apollo missions.
Their evidence, along with all the others, says we went to the moon!


It’s very faint, and it’s taken a lot of processing, but for my money there is an object in the same location as the LM, and a hint of a trail to the ALSEP area.
The LUTI imager does a better job, picking out the disturbed ground around the LM and LRV, the path to the LRV and also to the ALSEP.


It’s very obvious that we can make out the lunar module, the ALSEP site and the LRV VIP spot. A larger document identifies the correct location, but fails to capitalise on the find and show it in its full glory. A 2009 paper discusses the halo around the landing site from those images. So when idiots on the internet make claims like this:


Basing their argument on possibly the lowest resolution image possible, available on a page that merely summarises the Chandrayaan 1 mission.
And then double down on it on another youtube channel:
All three images show evidence of human activity, and the nadir and aft images the LM itself. Trails to the ALSEP and the LRV VIP sot are also evident.
So despite straydog02’s protestations, there are better quality versions of the image, they aren’t hard to find, asking nicely works, and the sources where you find them confirm that Apollo 15 happened as described in the history books.
Oh, and please don’t insult CLERIC_58 by accusing him of being me. He isn’t.
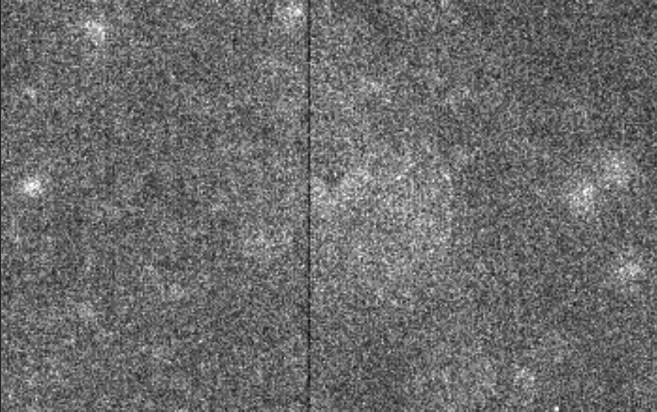
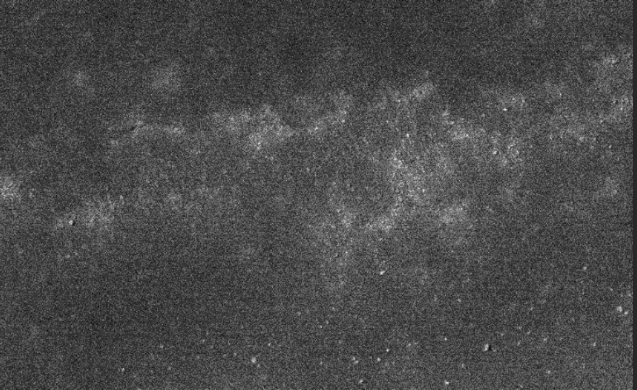
We also make use of South Korea’s Danuri probe. The Shadowcam instrument on this was designed to see into areas normally in darkness, but it has also been used to observe the moon under Earthshine. Here’s their data explorer, and this specific page contains the imagery covering Hadley Rille.
The image itself requires a lot of adjustment, using HDR toning, level adjustment and so on, but here’s the area covering the landing site (left) and LRO on the right.


And we also have the same view from Chandrayaan-
It does an even better job in August 2023, capturing the LM shining brightly in two successive orbits


And also in this fabulous oblique shot:

